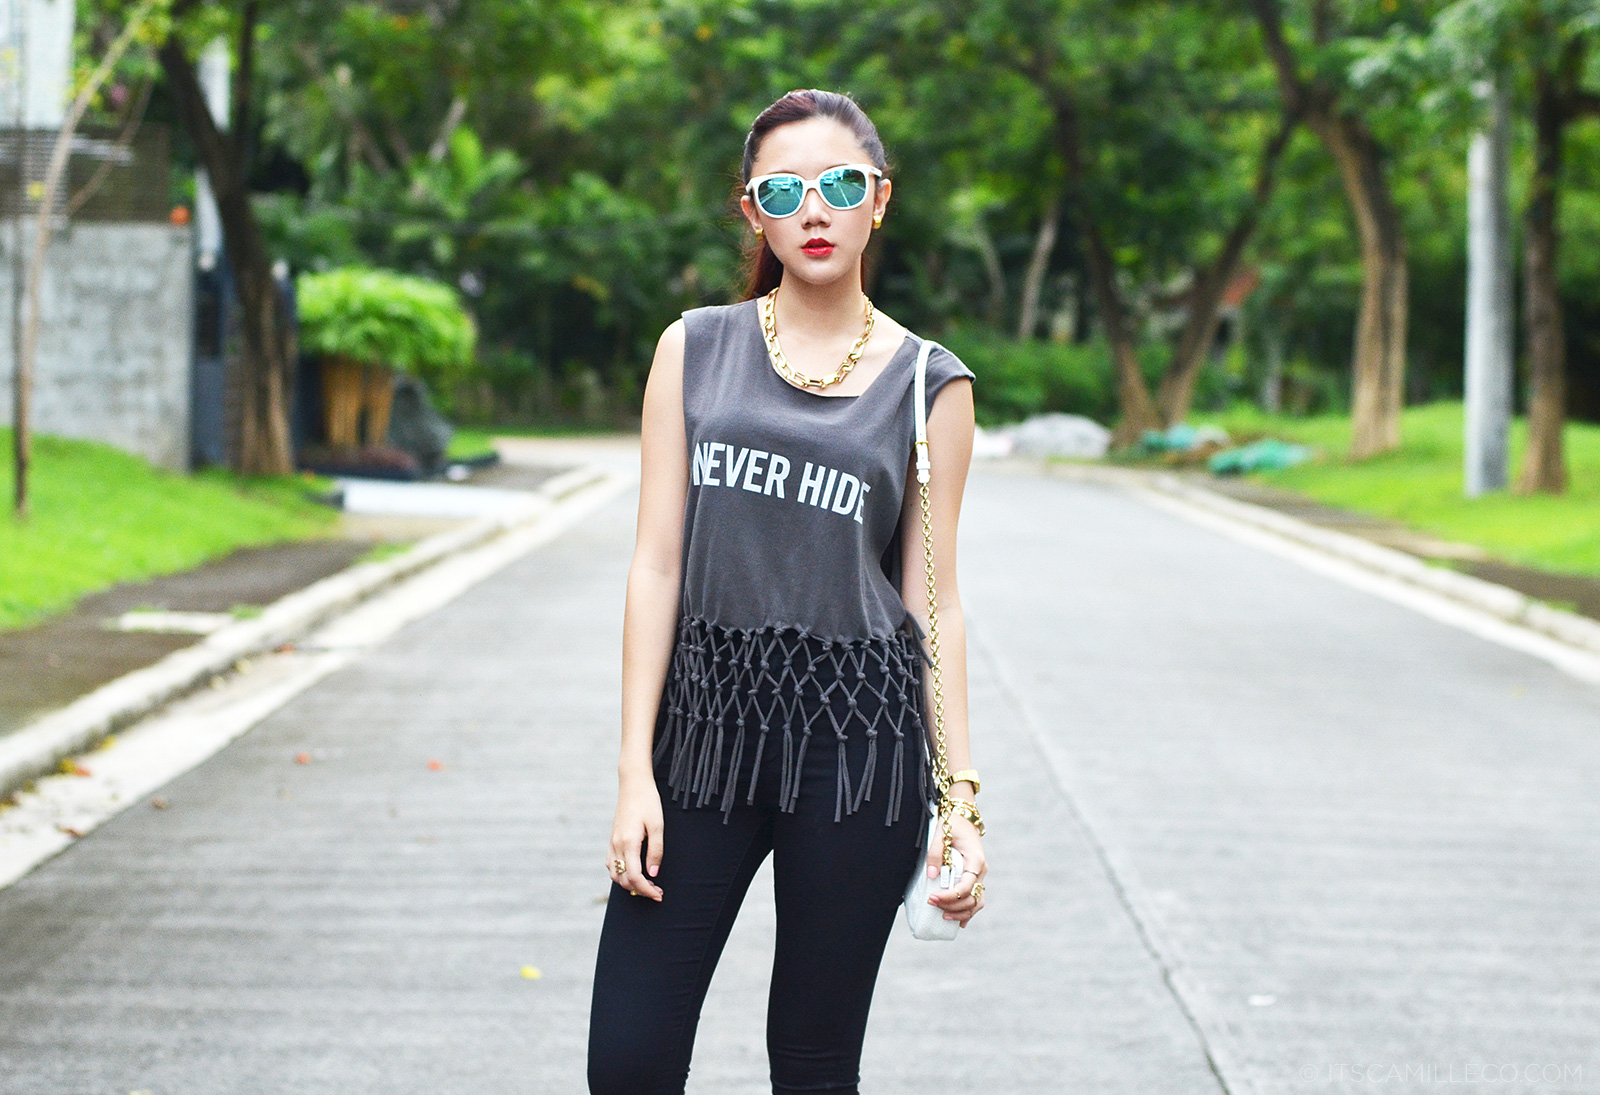
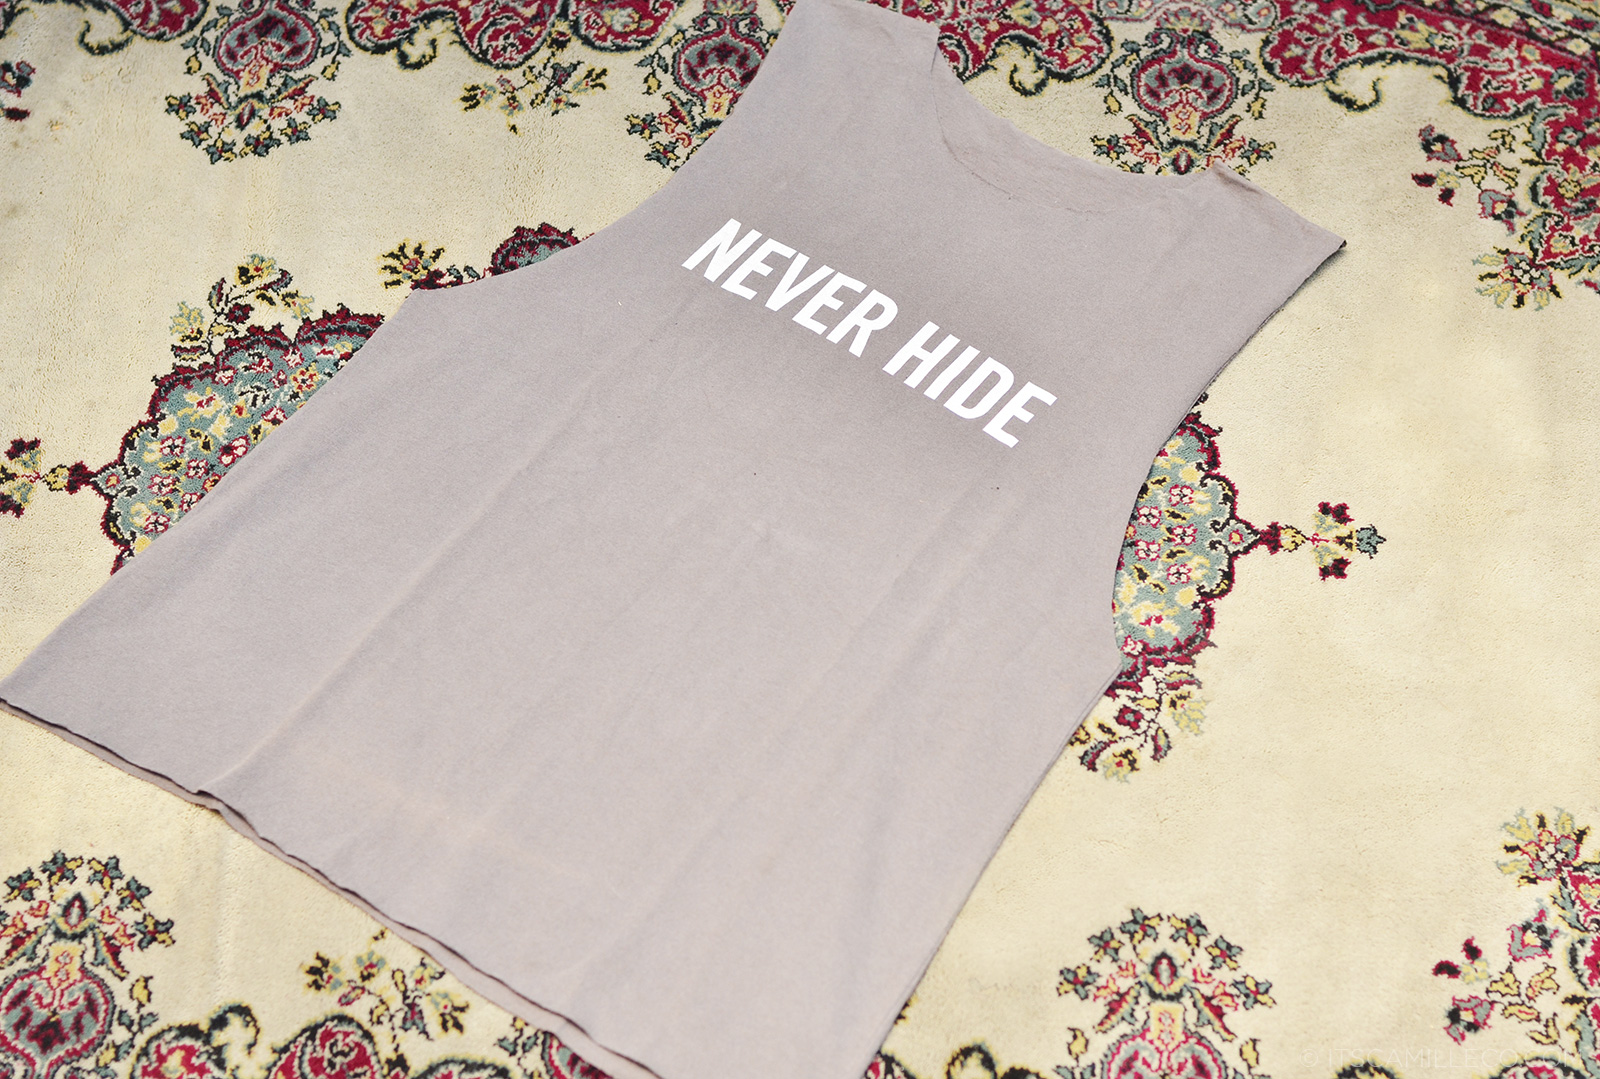
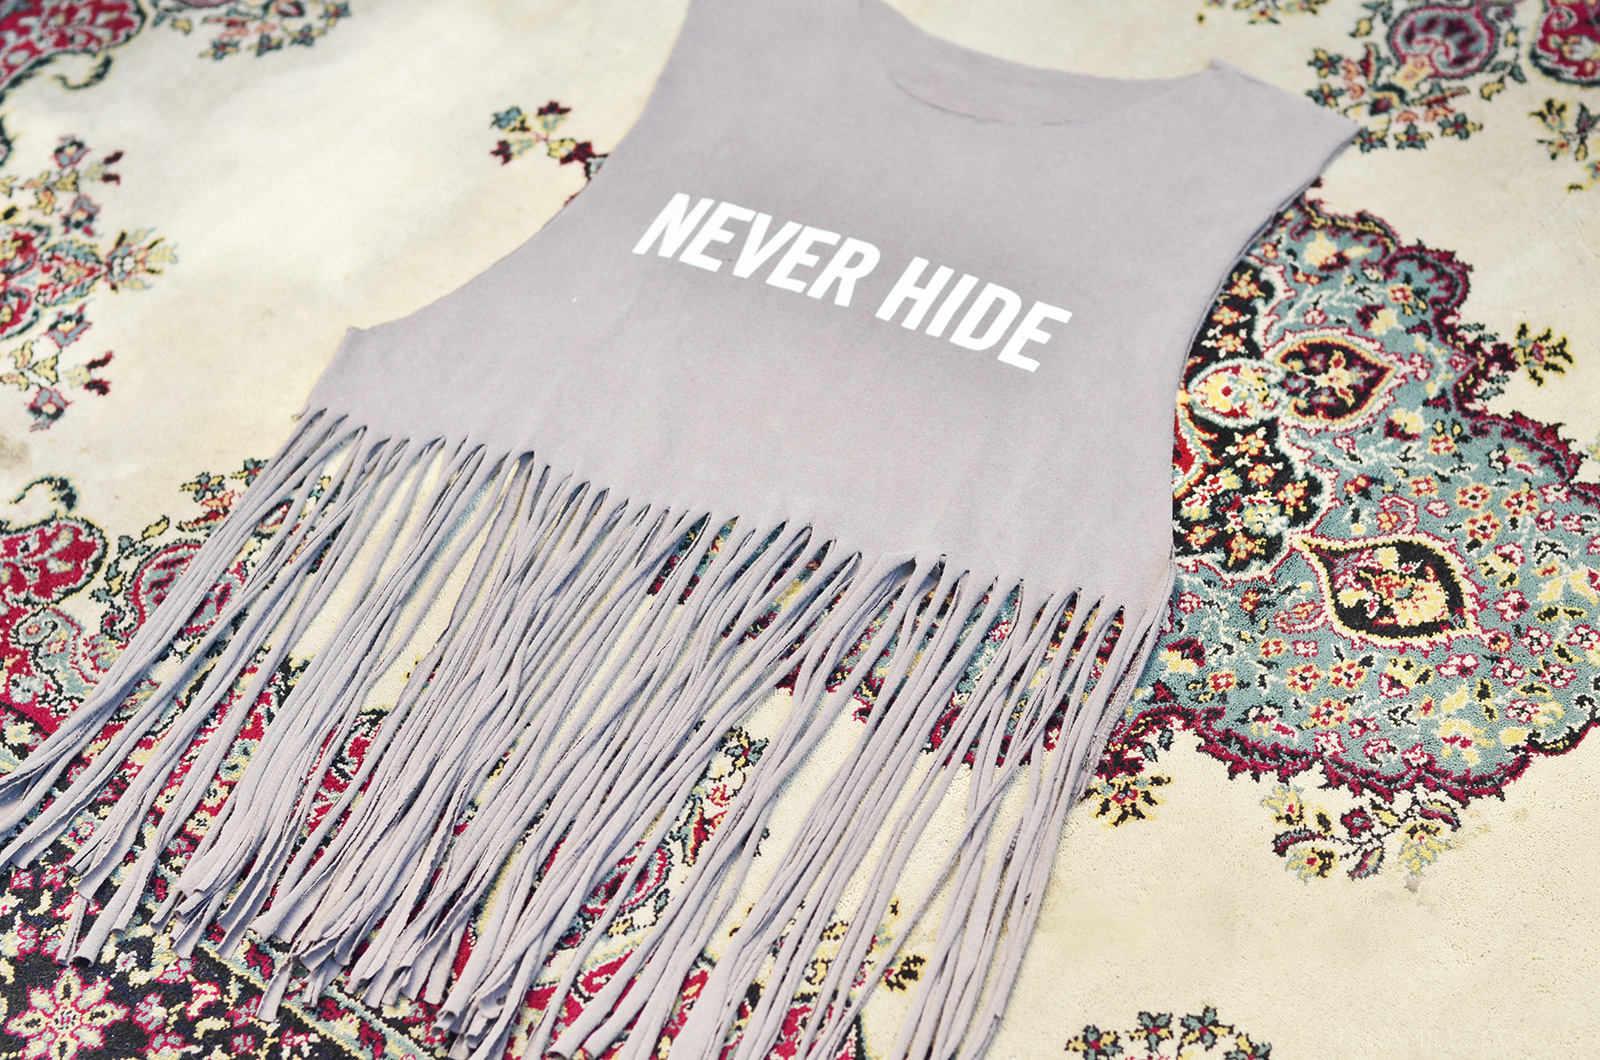
As promised, here’s my first ever Do-It-Yourself blog post! I got so inspired by my DIY talk for Goody’s Come Play event that I thought why not share a snippet of it here? I actually wrote this article first for BeautyBook.ph published here. DIY projects are fun, resourceful and most of all, practical. Unleash your inner Martha Stewart and let your creativity shine! Don’t worry. It doesn’t have to be complicated. In fact, this DIY technique I’m about to share with you is super easy. It’s one of the most common DIY techniques on T-Shirt reconstruction that you’ll find on the web, so I definitely did not invent this. I wish I did though! Anyway, are you ready to turn your outdated and boring shirt into a fringe and fishnet muscle tee like the one I’m wearing? Read on below to find out how!
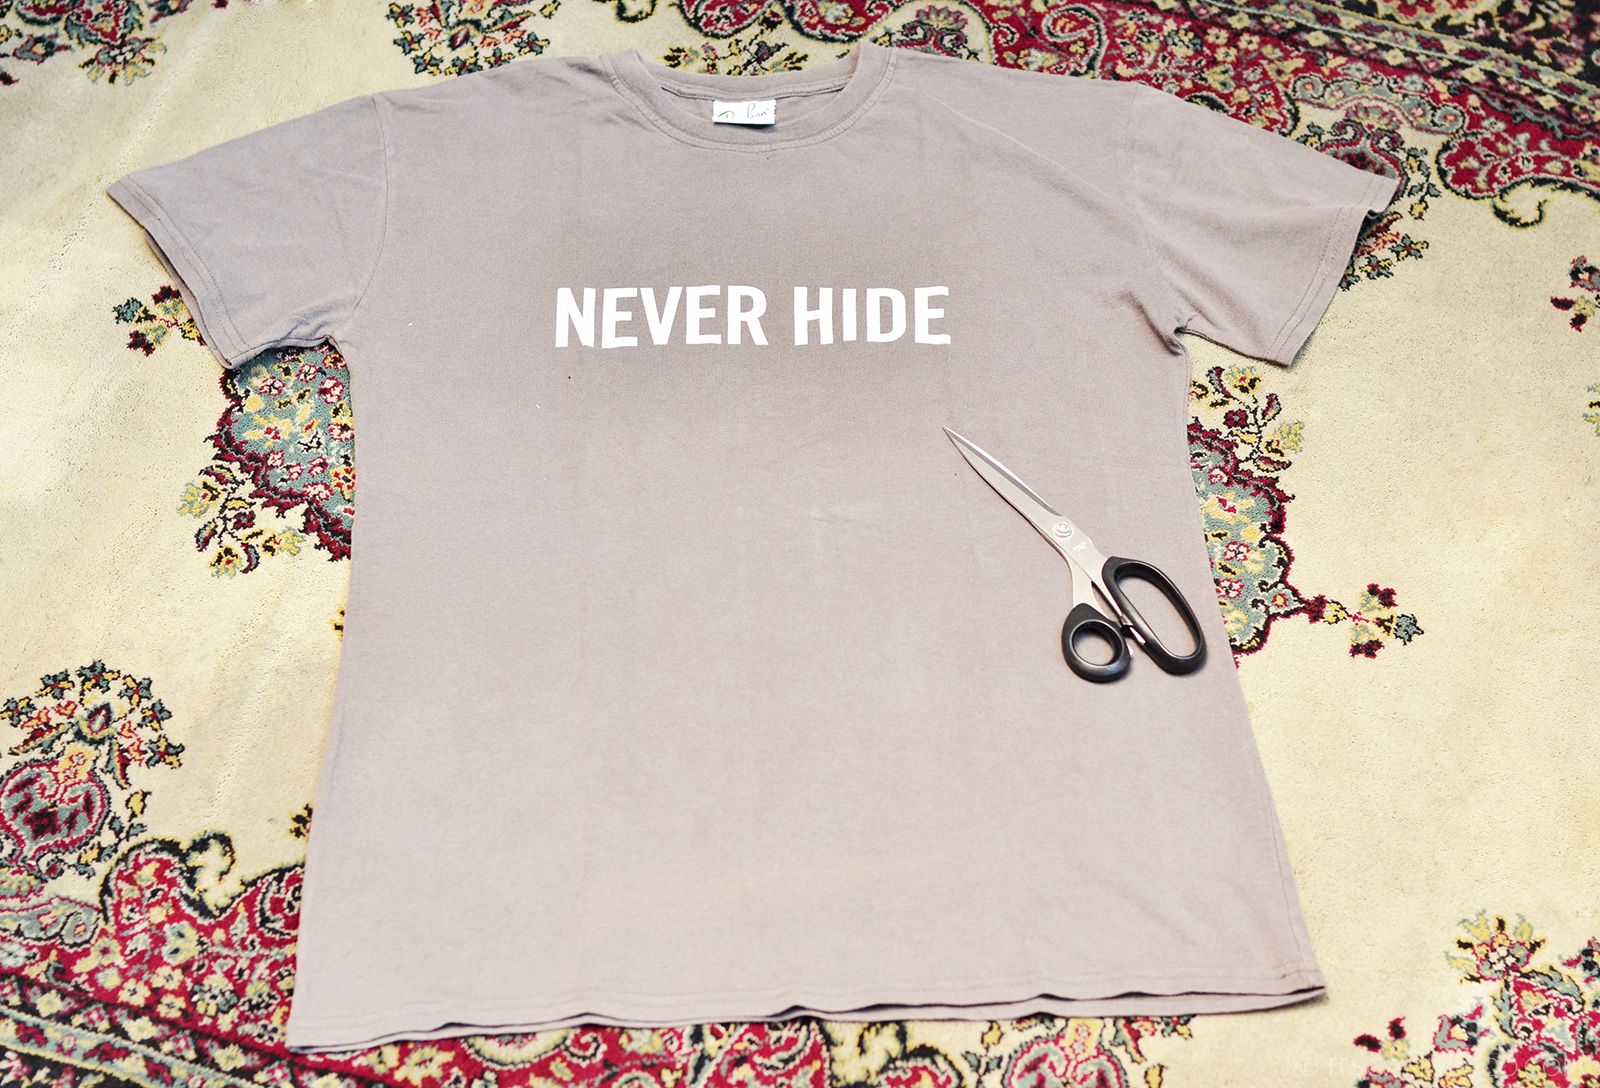
To make your DIY tee, all you need is a big/loose knit shirt and a pair of fabric scissors. I prefer unisex or men’s shirts because the fit is perfect for muscle tees.
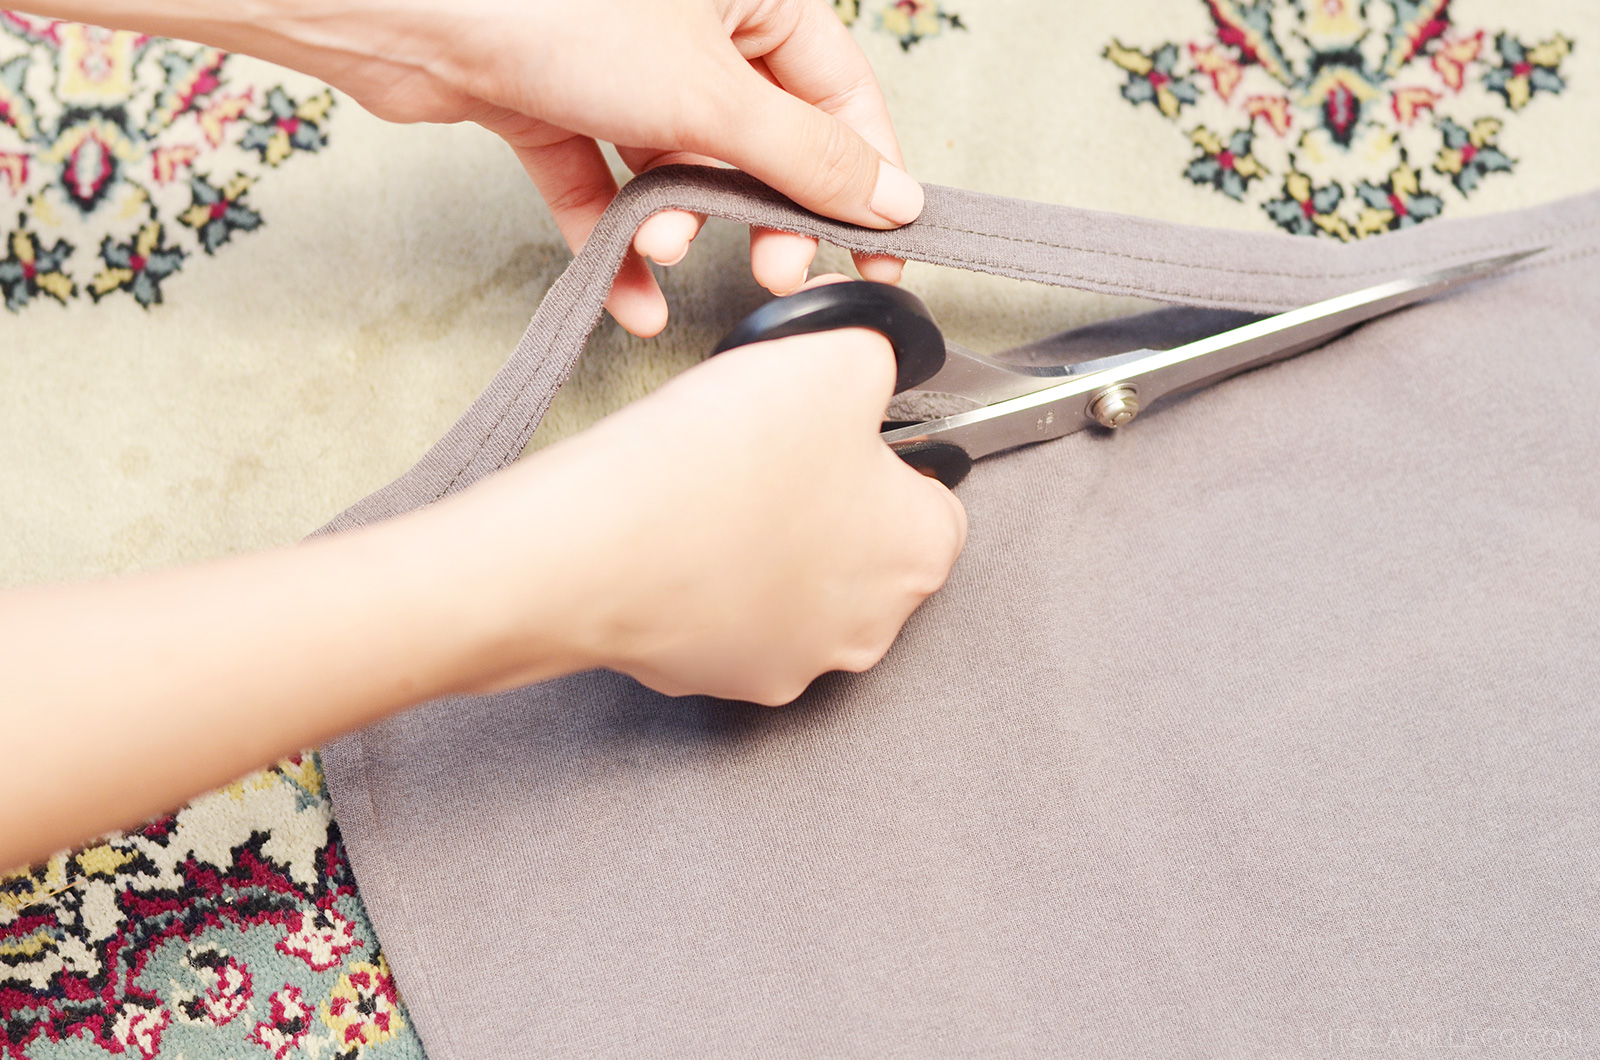
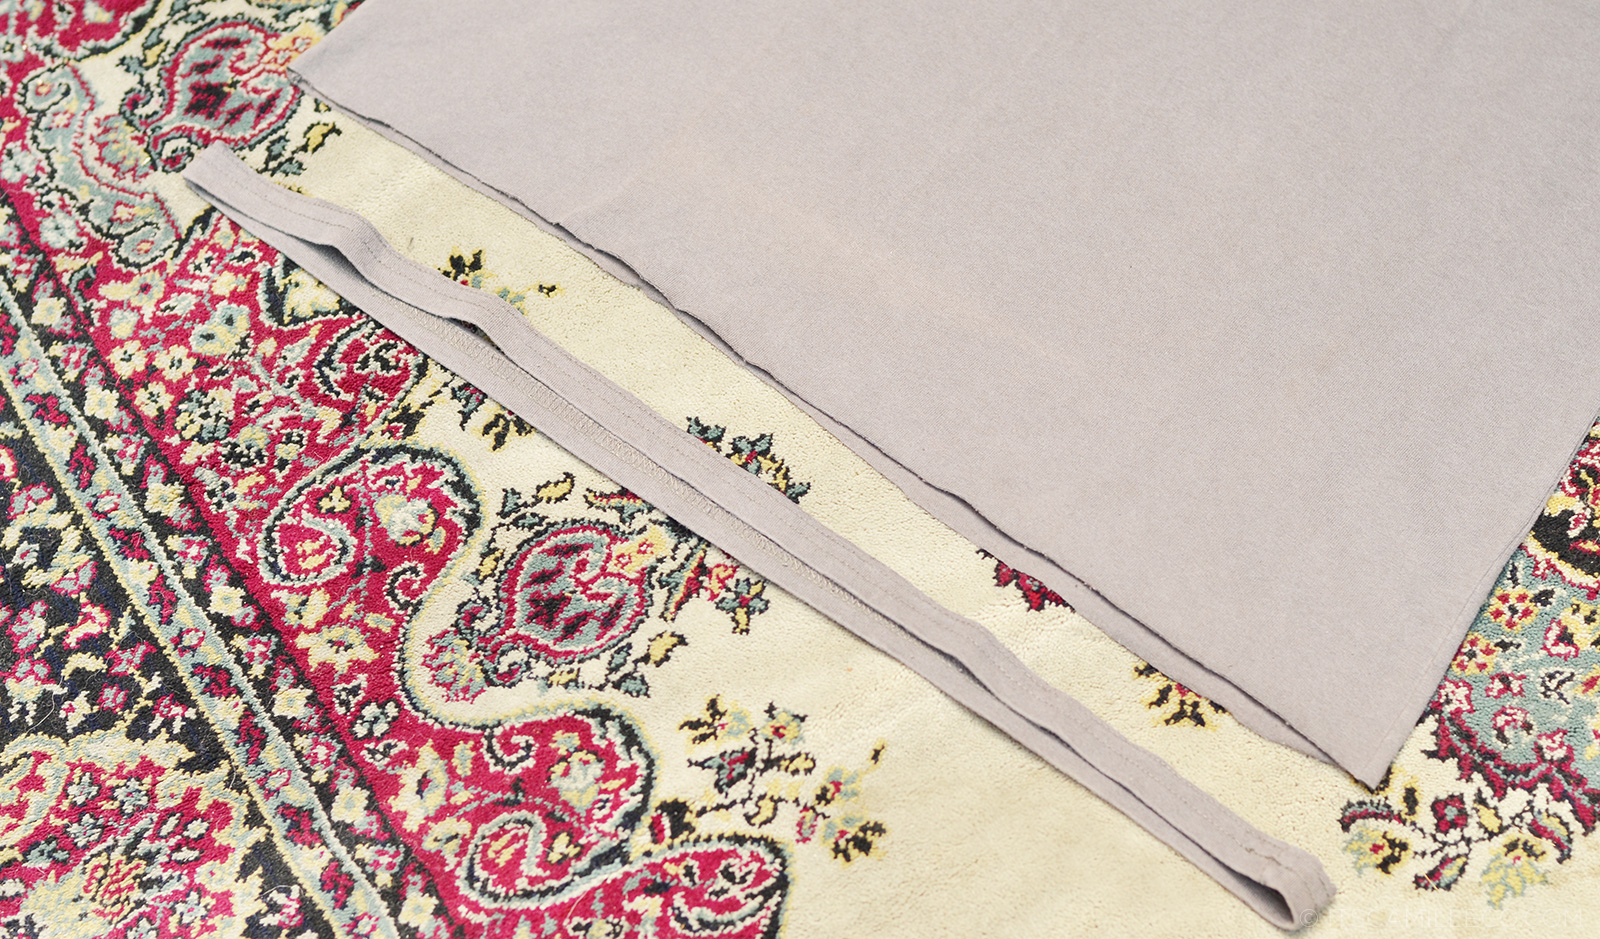
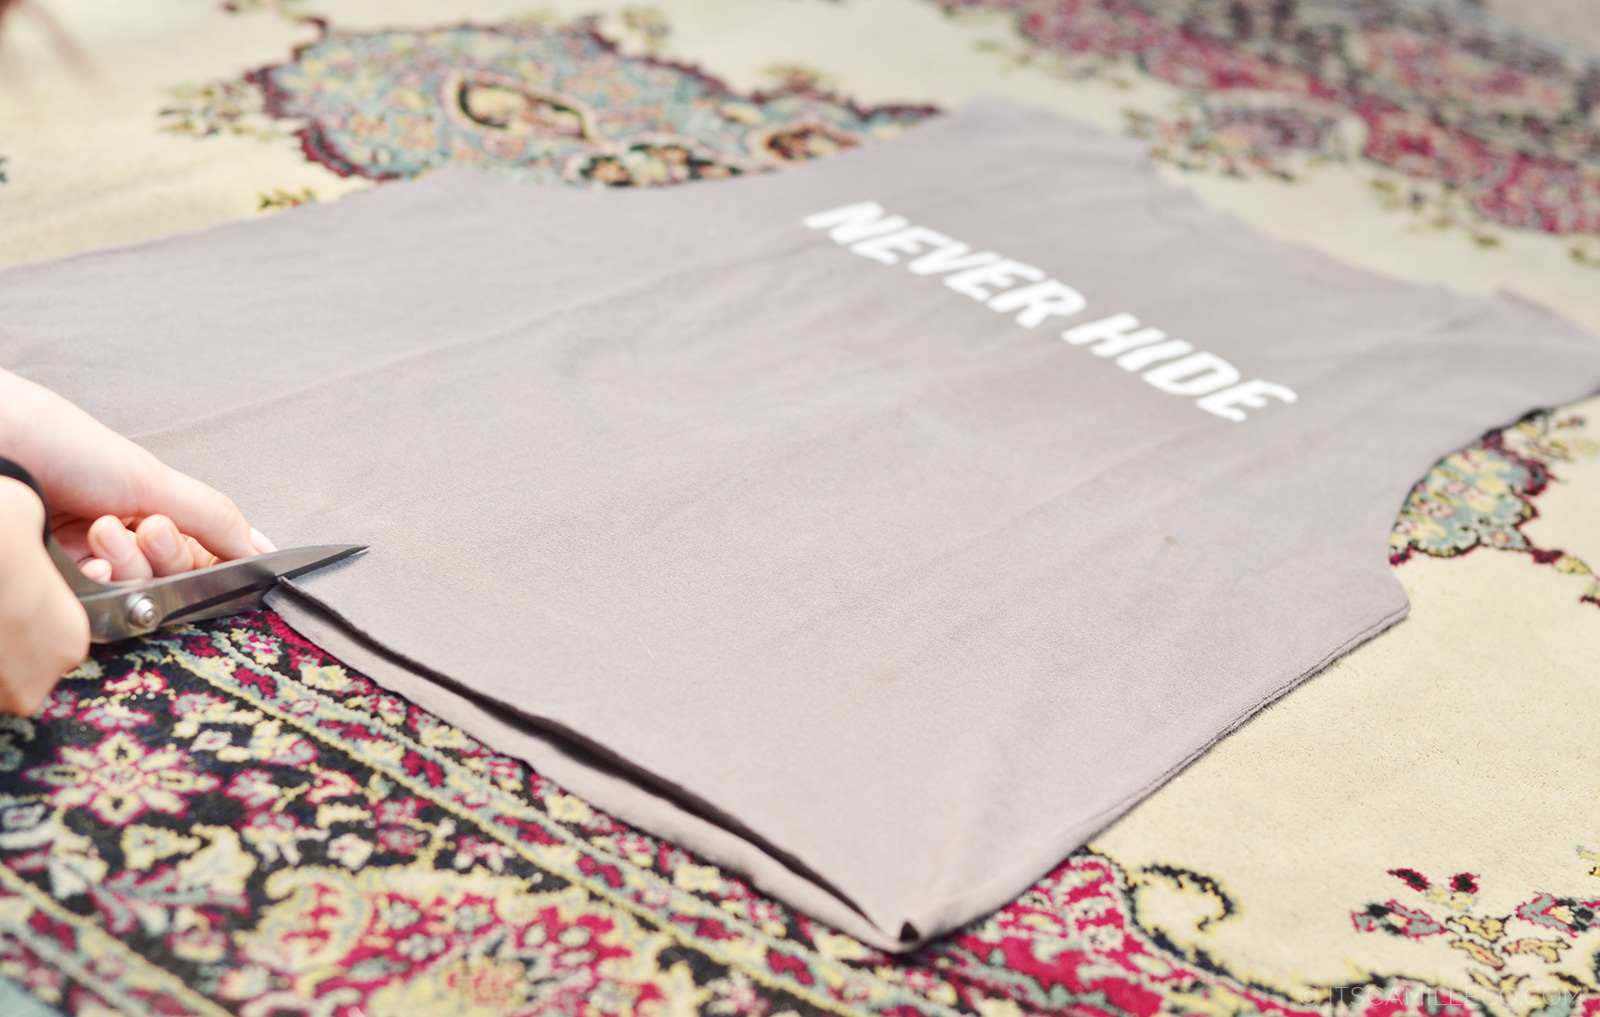
Step 1: Cut off the hem of your shirt. It’s better to cut one side at a time.
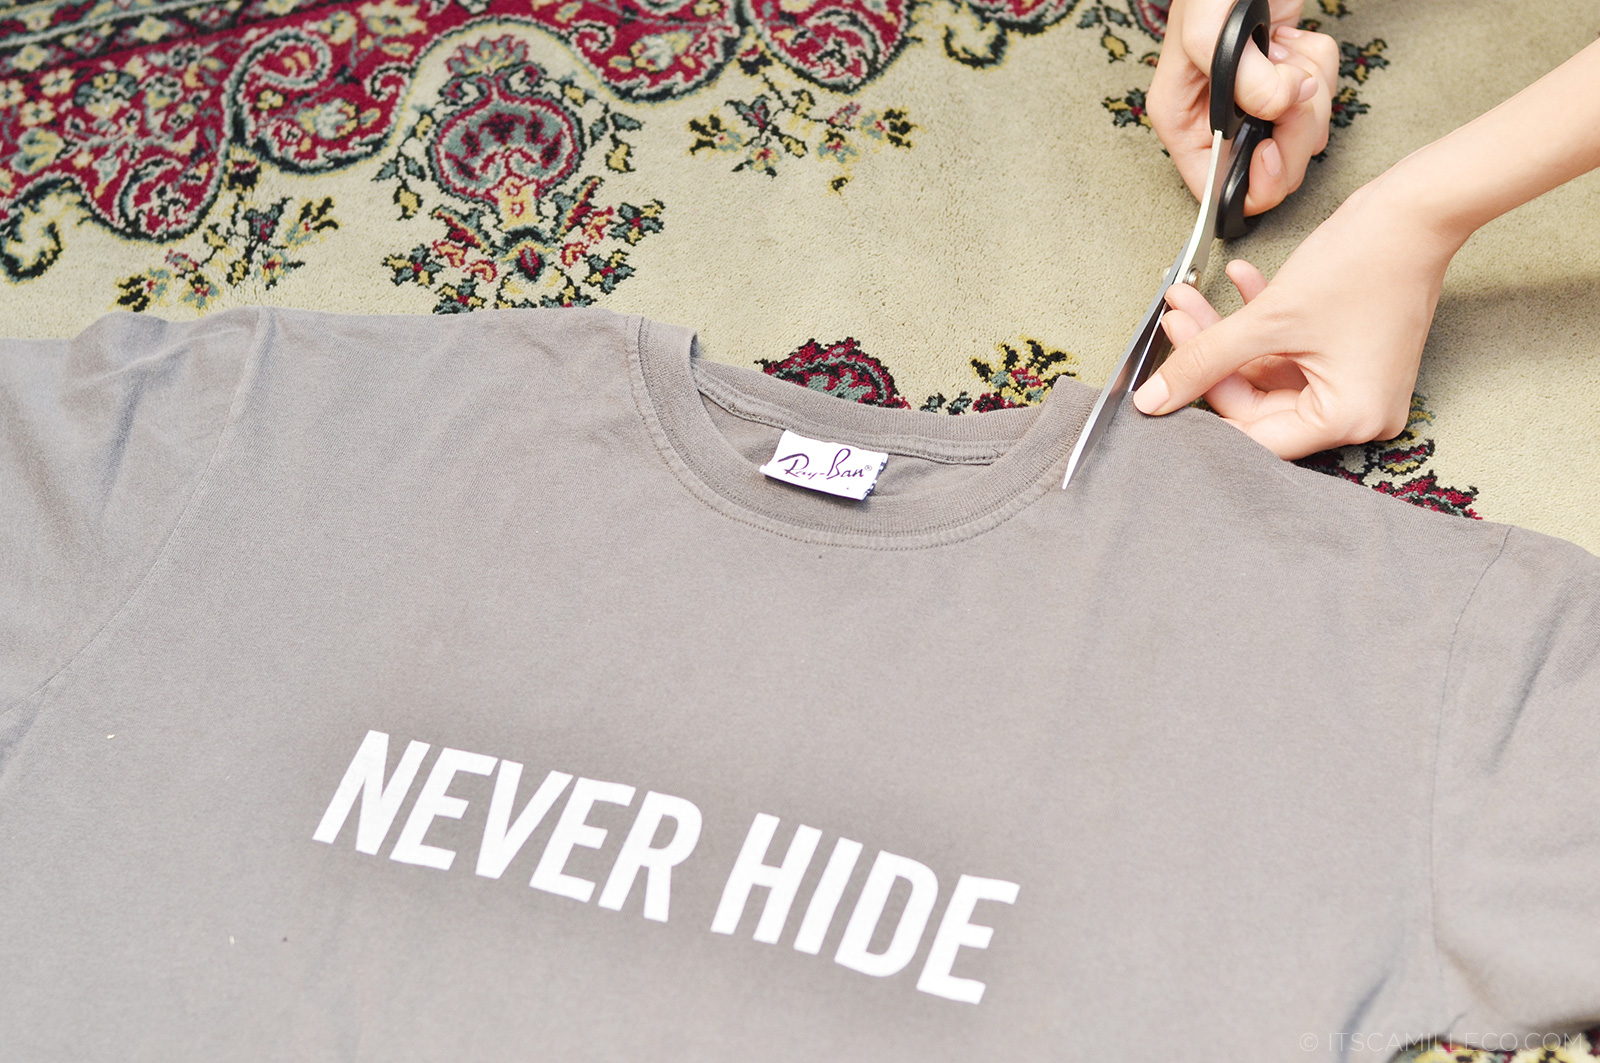
Step 2: Cut off your shirt’s collar. It doesn’t matter if your shirt has a round or V-neck collar.
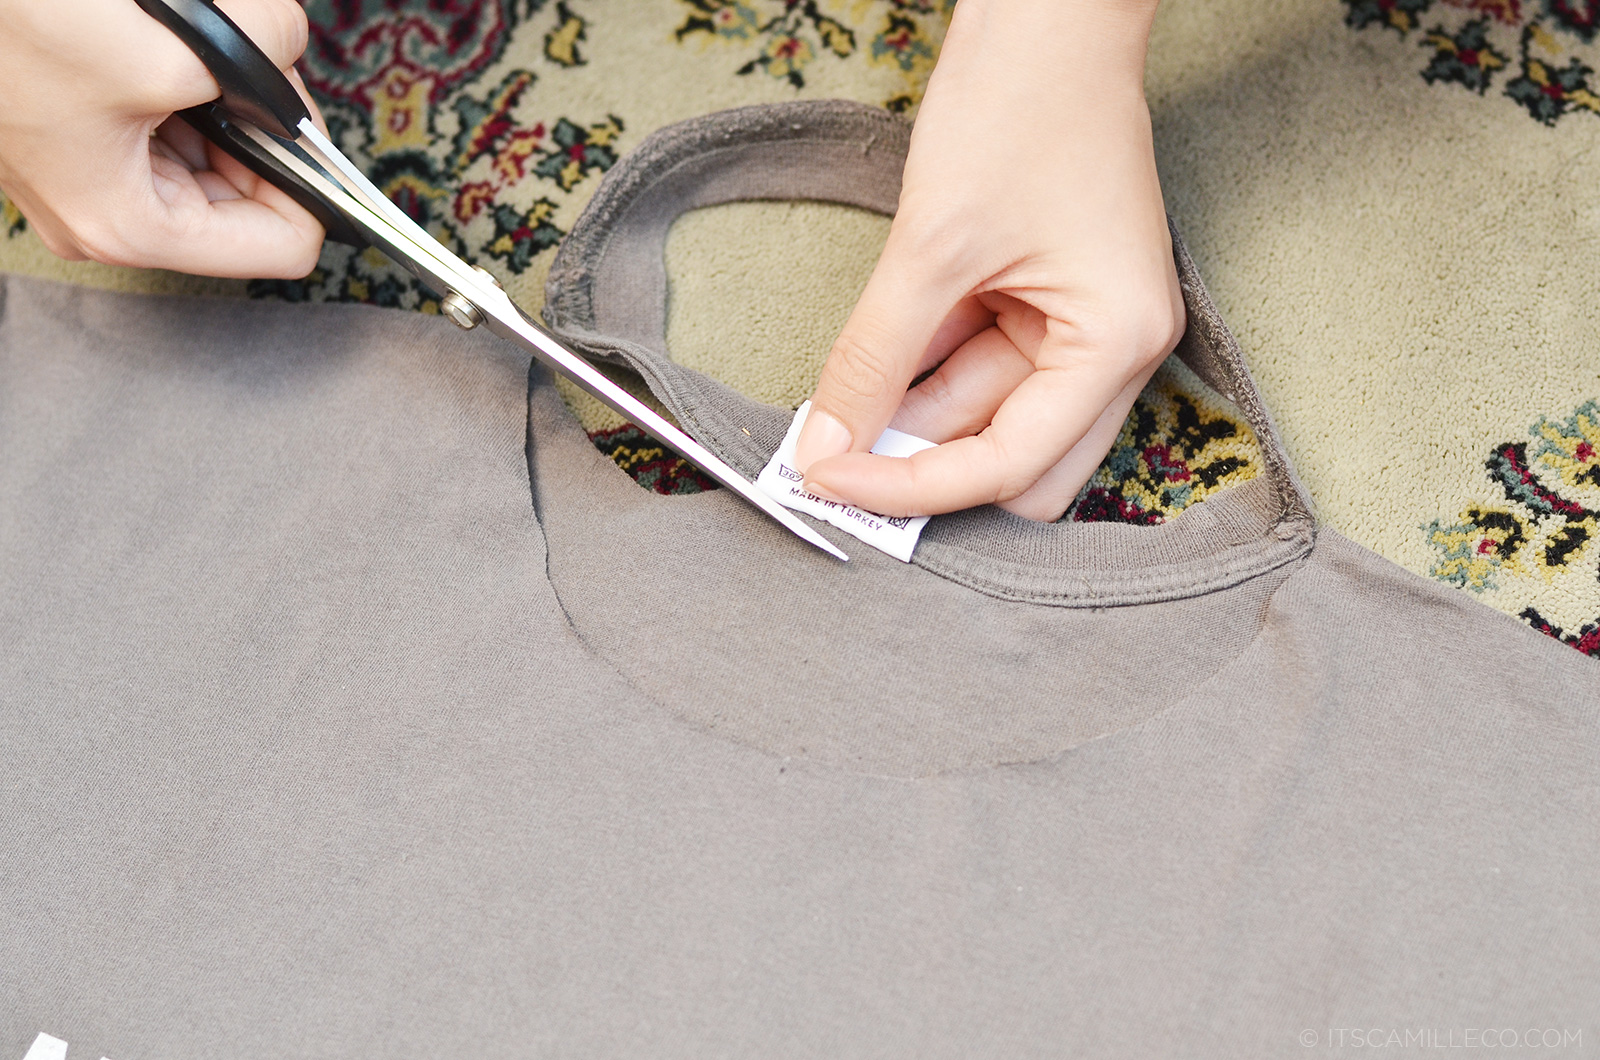
Again, cut it one side at a time.
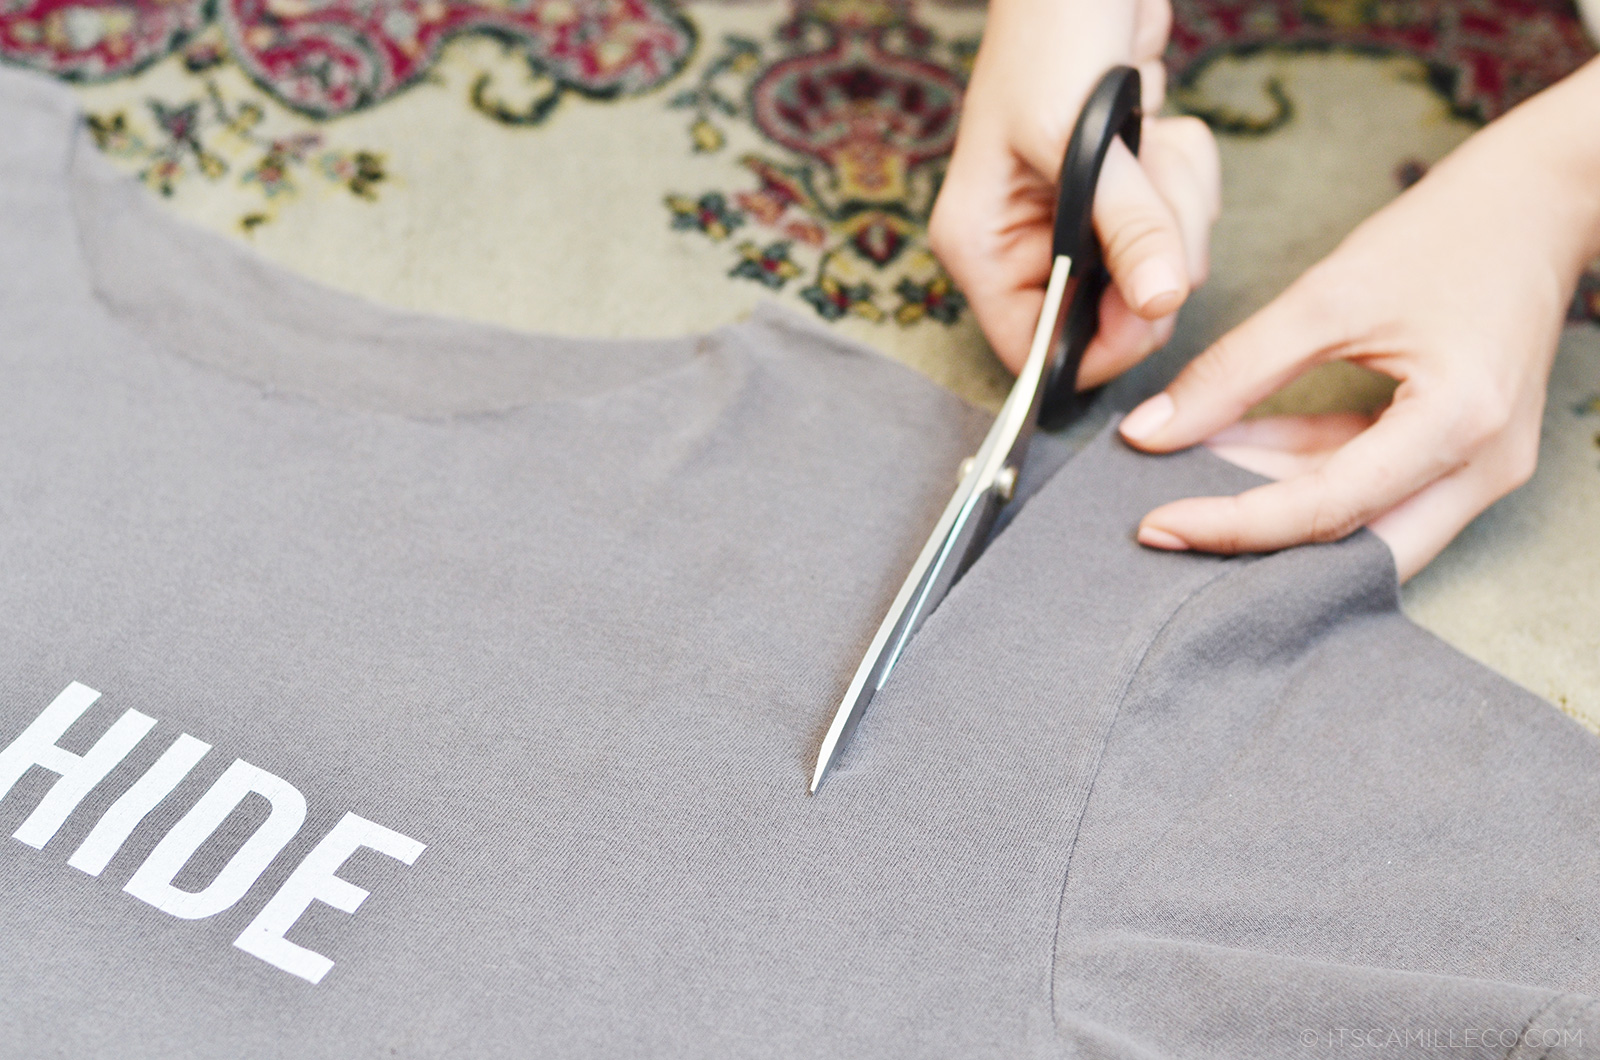
Step 3: Cut the sleeves off and create a bigger armhole to achieve the muscle tee look. If you’re afraid you won’t be able to cut your armholes perfectly, you can always use tailor chalks or pins to serve as your guide. I prefer doing it freestyle, just because I’m cool like that. LOL! Just kidding.
To make sure both armholes are similar, fold your shirt at the center and use the first armhole you cut as guide for the other side.
Tada! You’ve got your muscle tee!
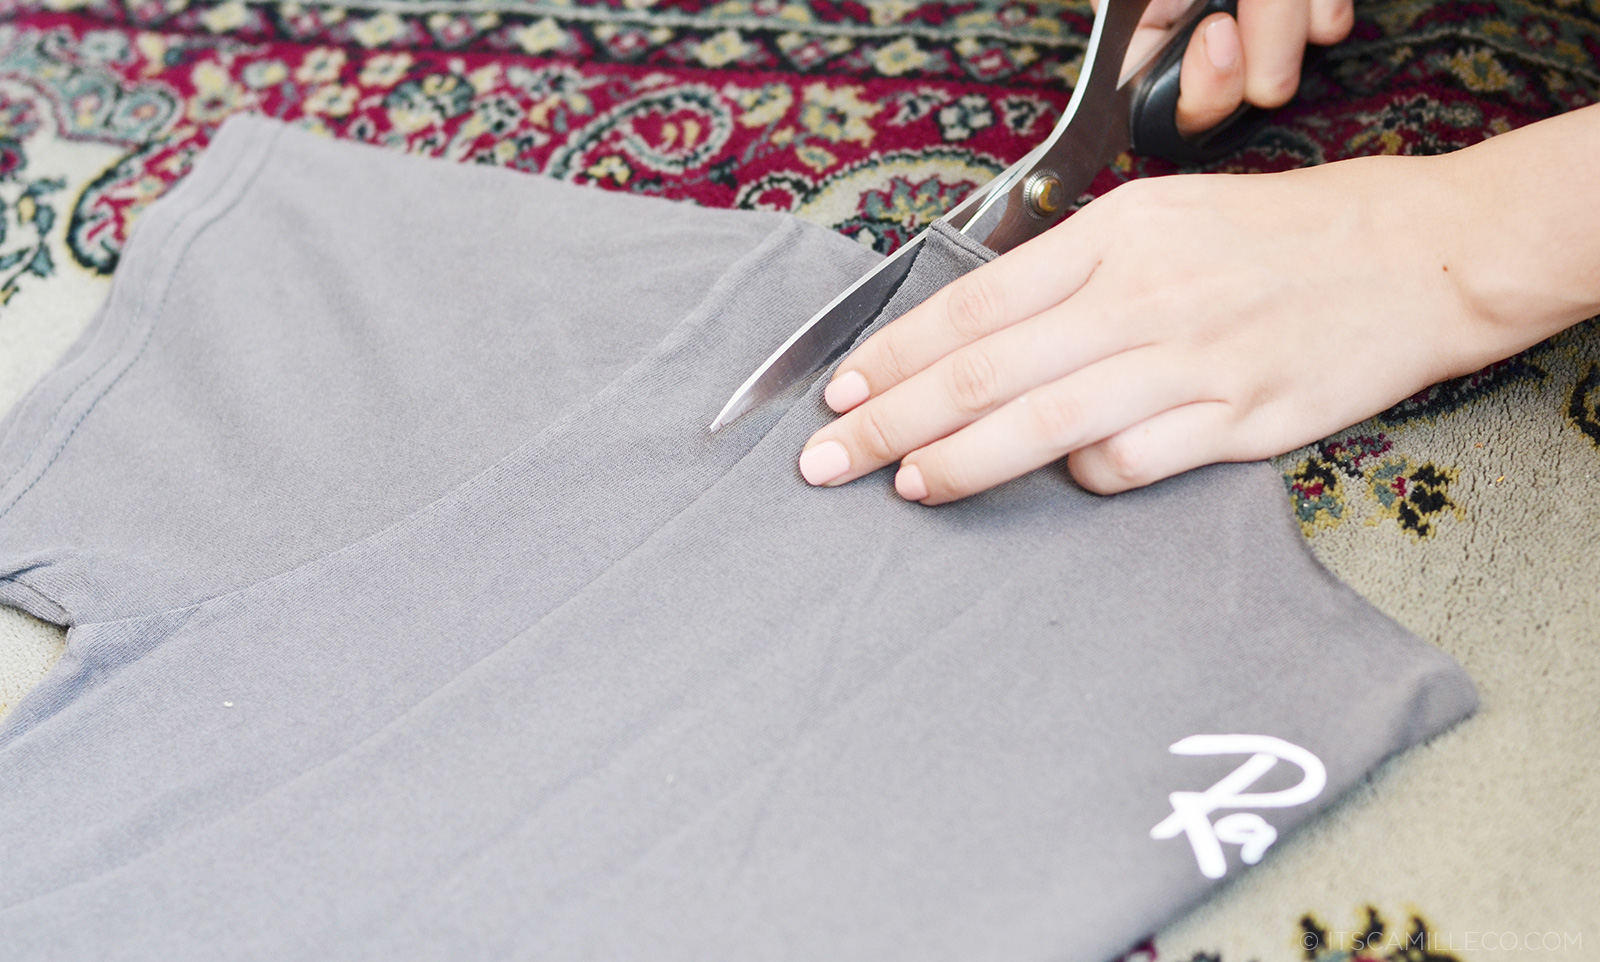
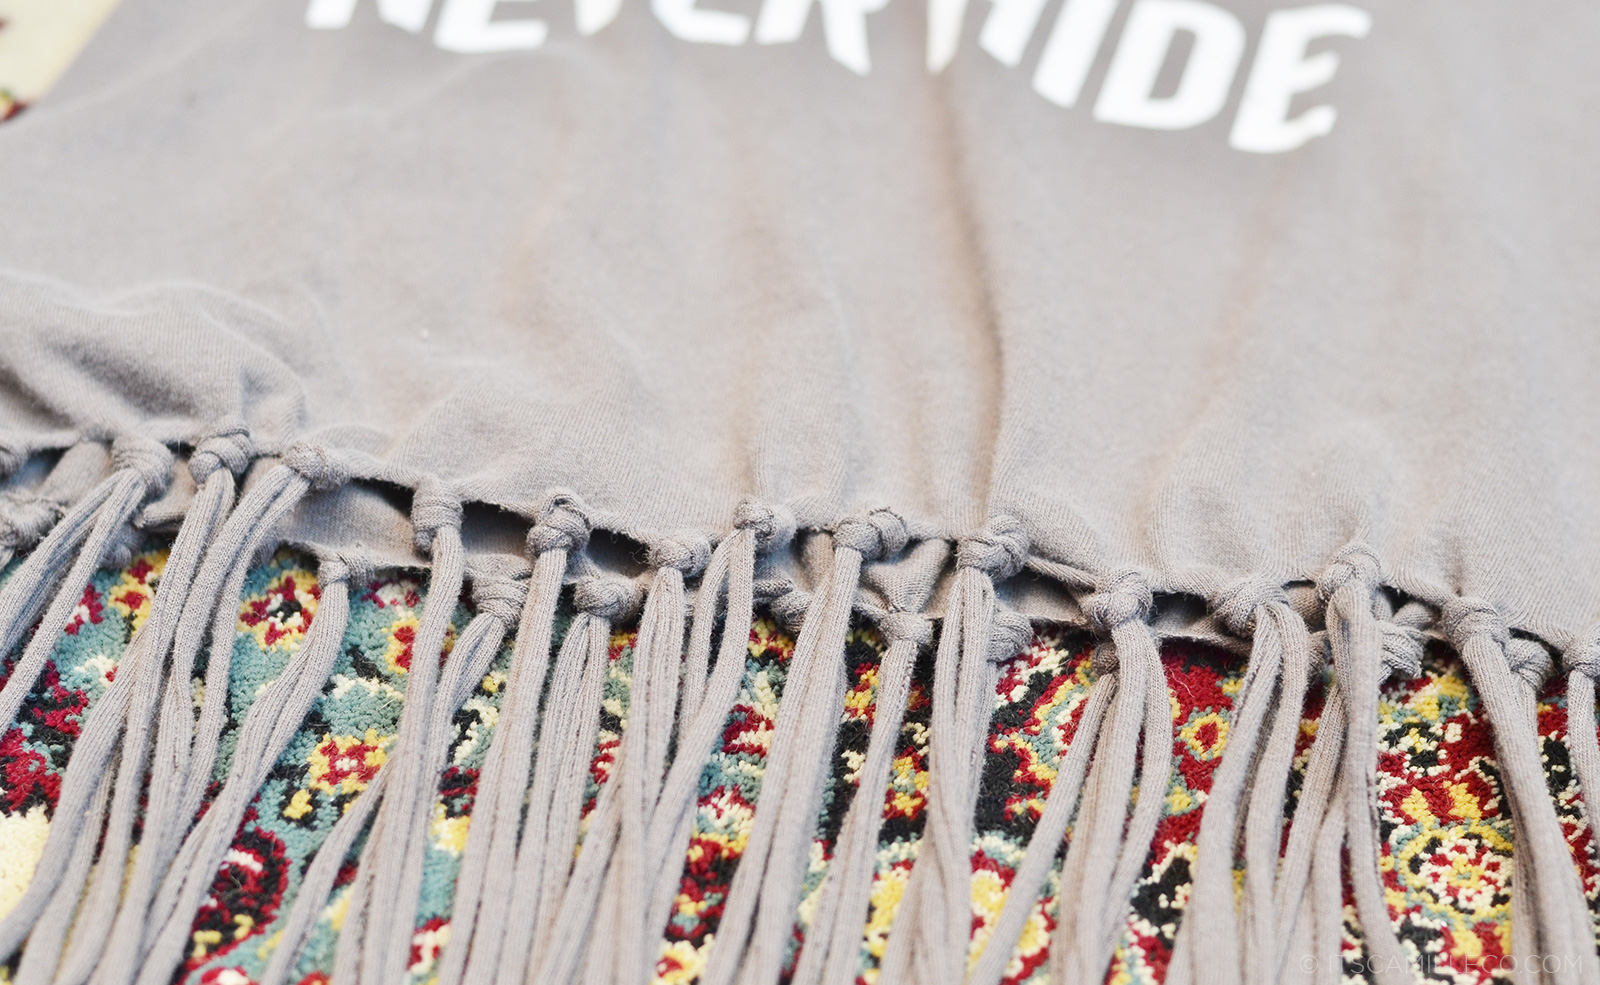
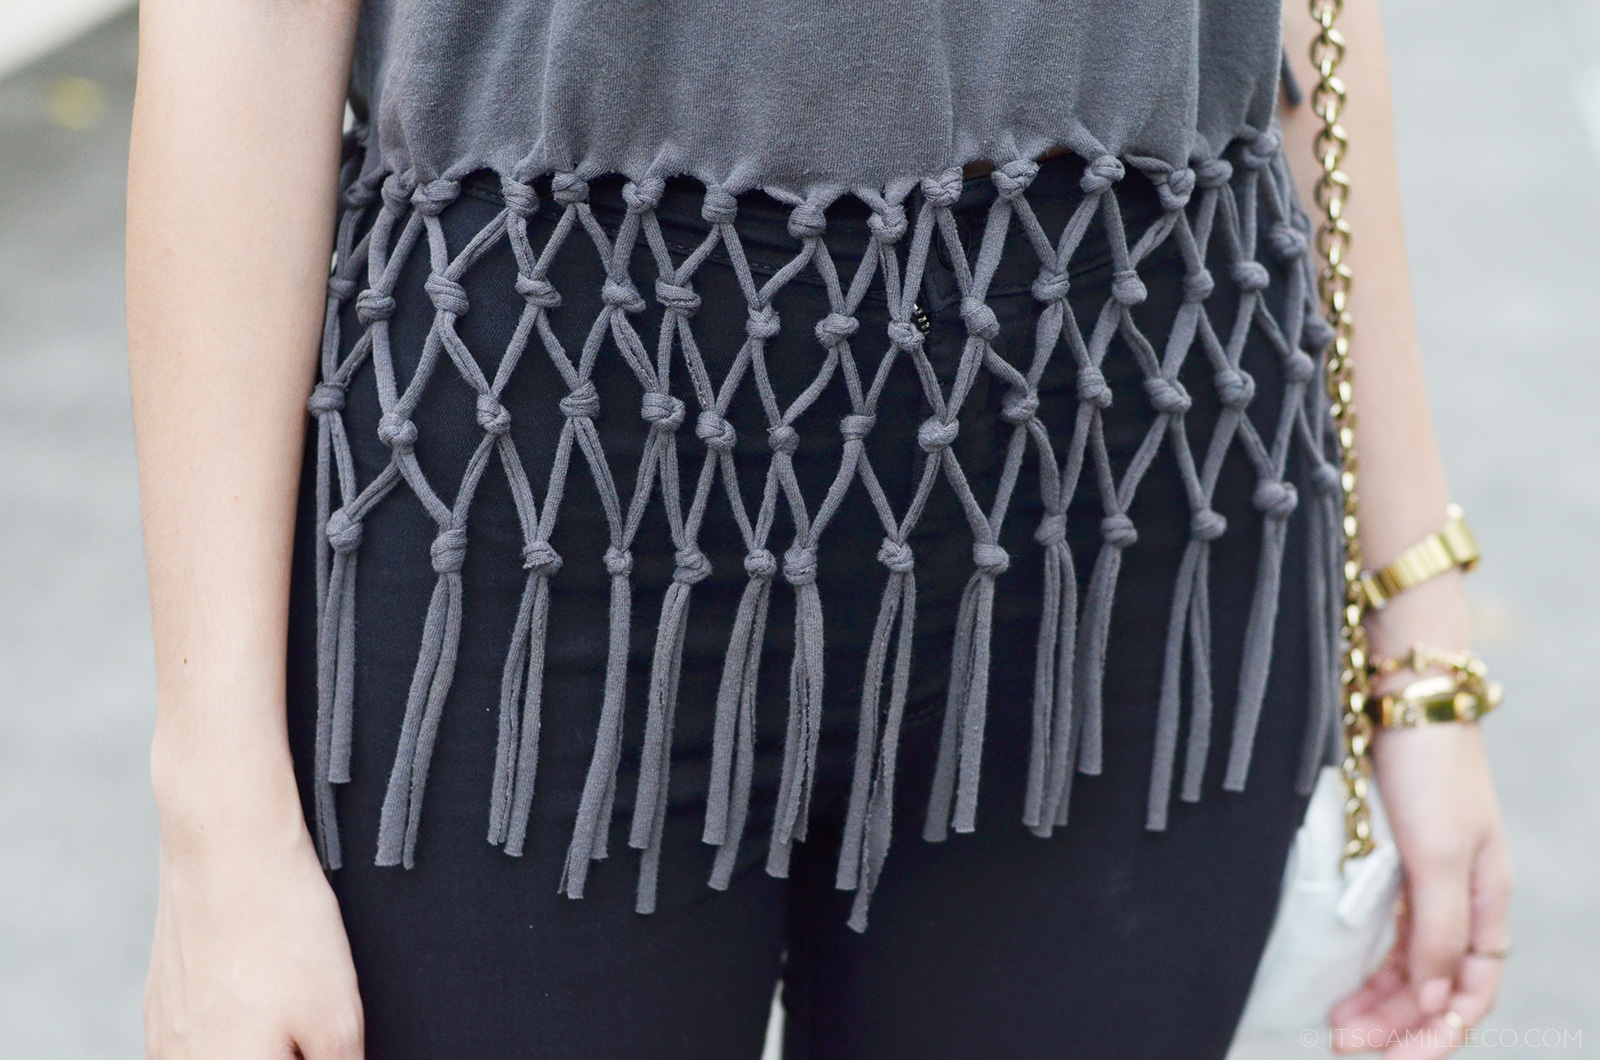
Step #4: To create your fringes, start by cutting your shirt from the bottom center.
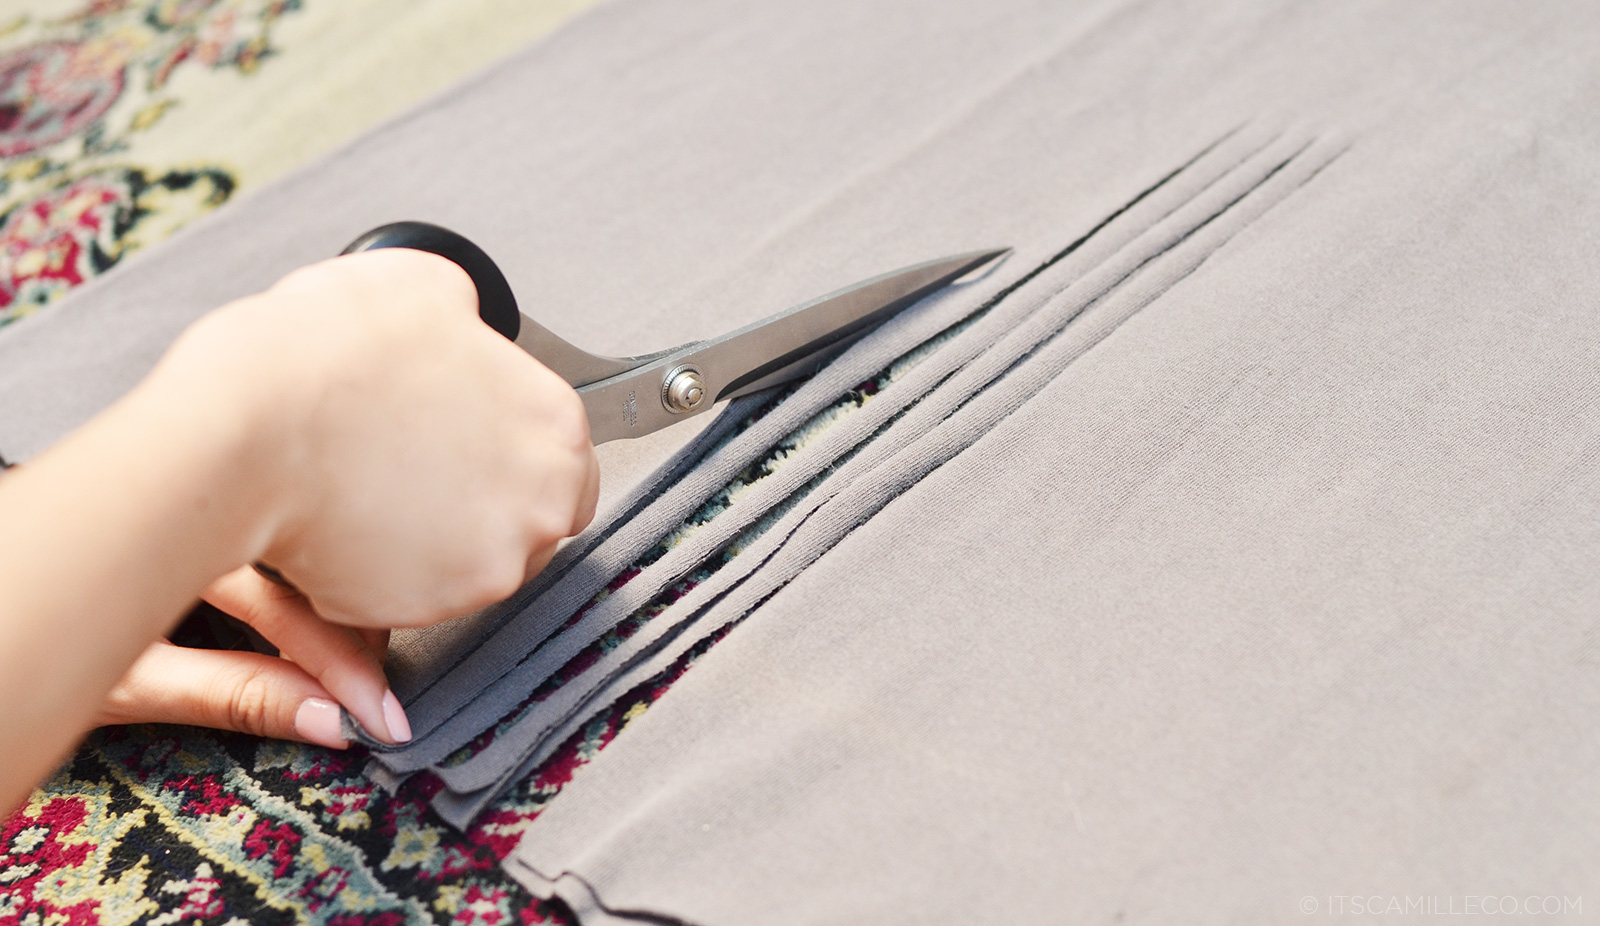
Cut strips all the way to the point where you want your fringe to start. Make sure it’s not too high up that it reaches your shirt’s armholes. Also, they have to be even numbered because you’ll be tying them in knots by twos when you make your fishnet top.
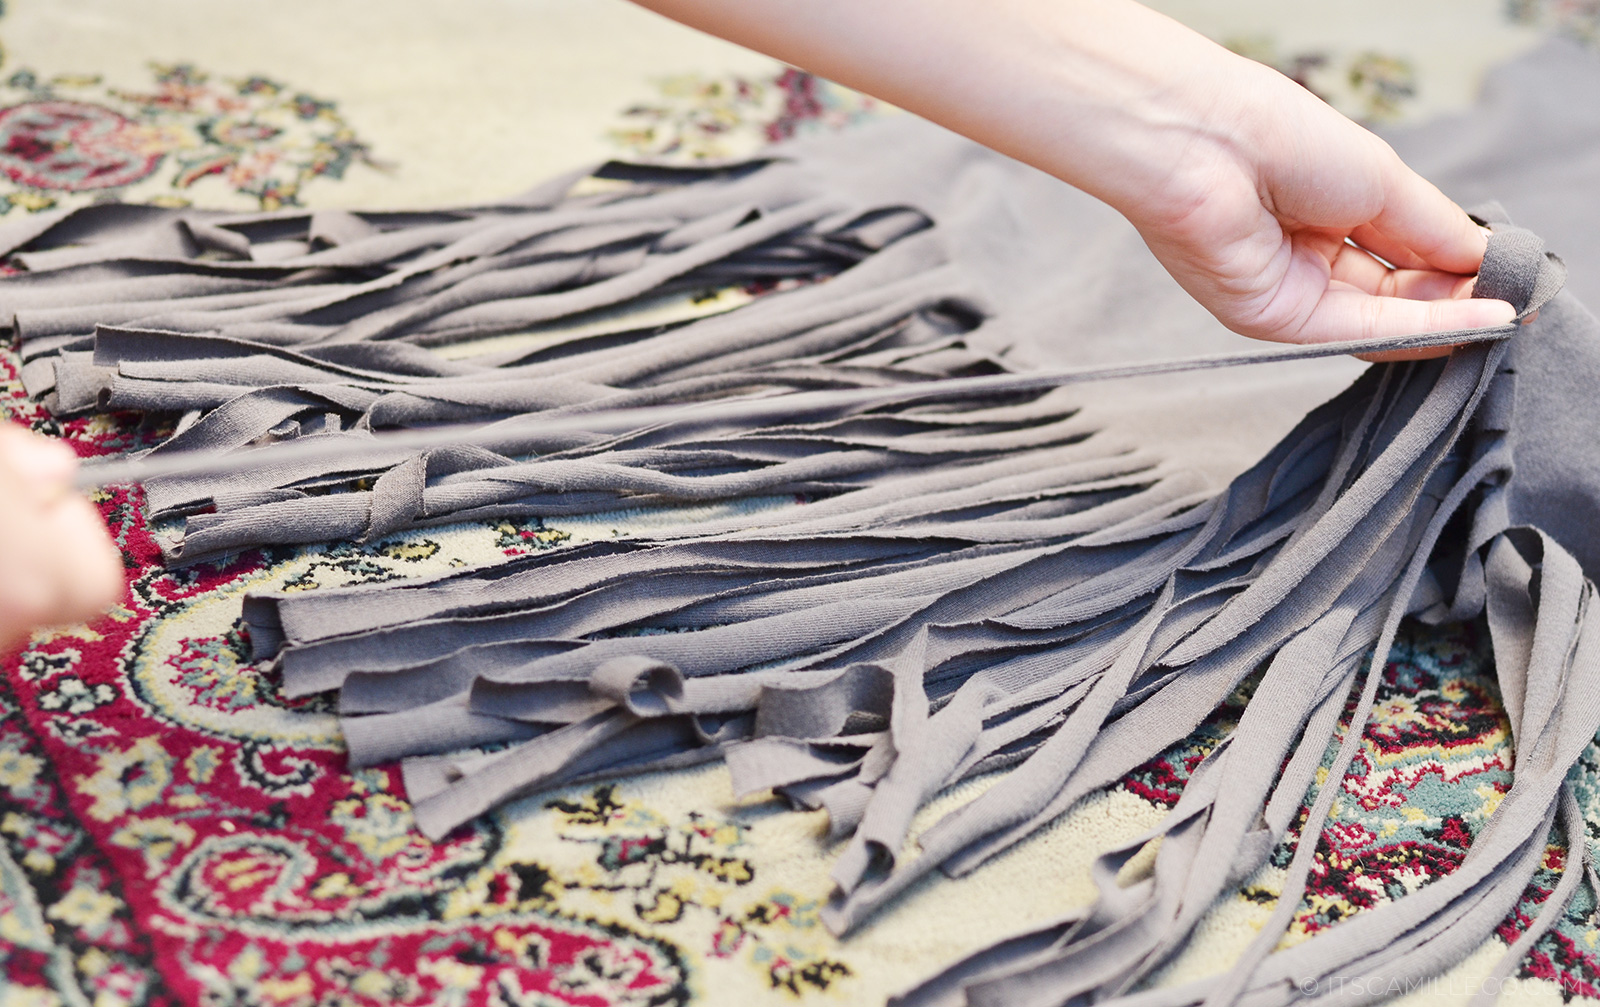
Step #5: After cutting strips all over your shirt’s bottom half, pull the strips to turn them into strings.

This is how your flat strips will look like once you finish pulling them. They turn into rolled strings.
And there you have it! You’ve got your fringe shirt!
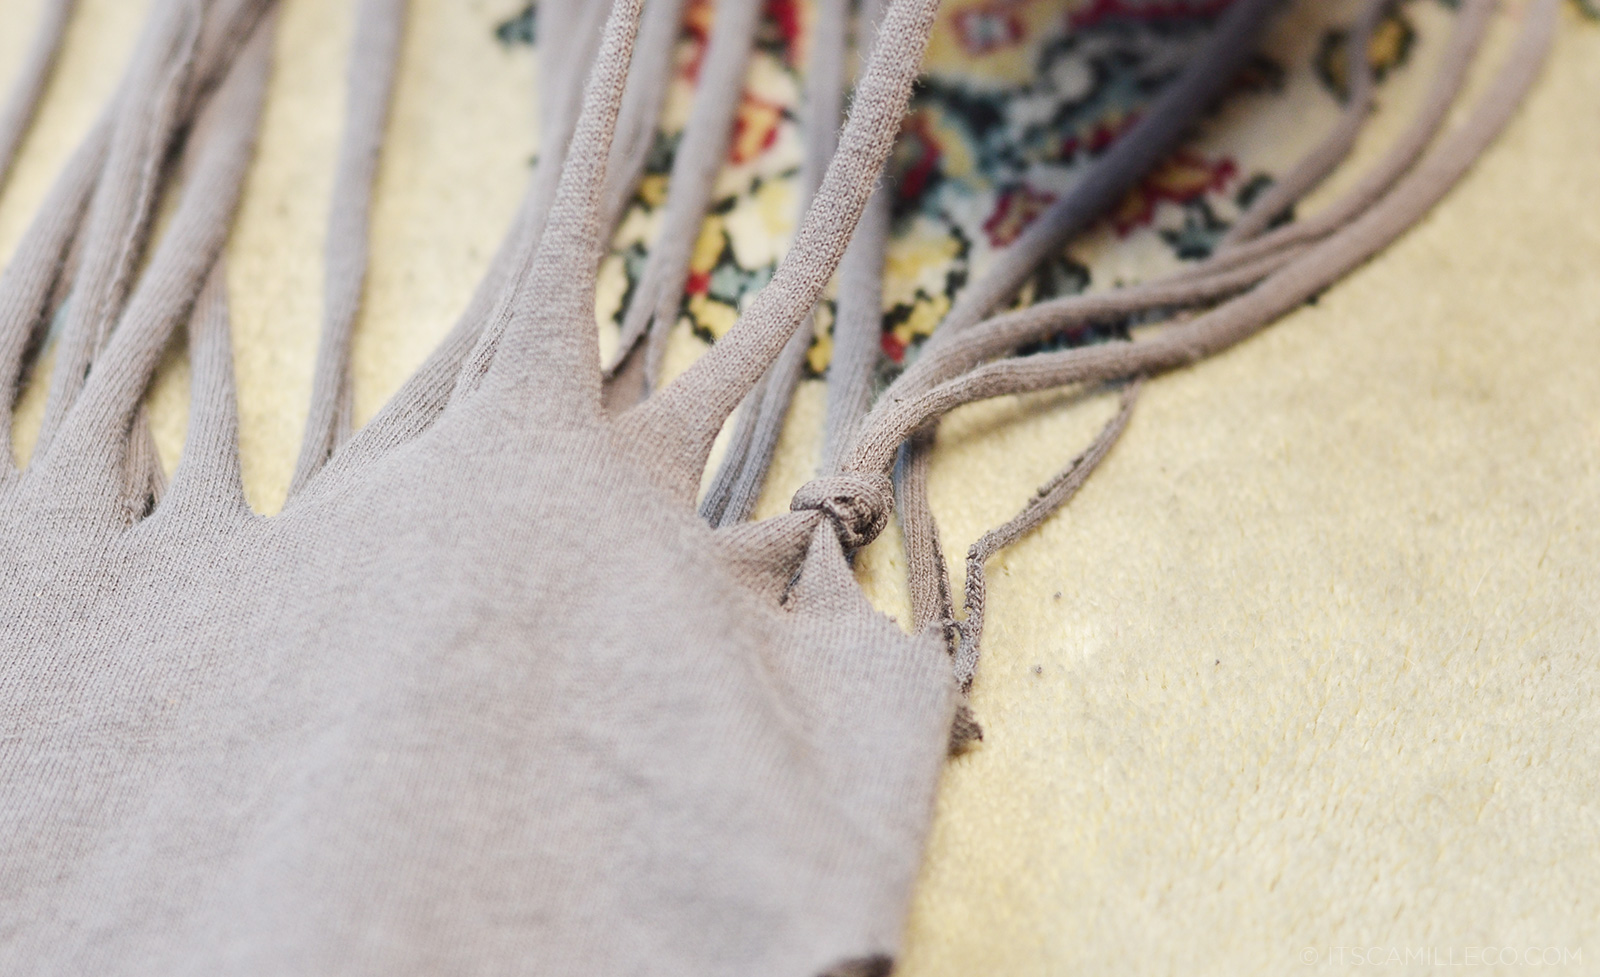
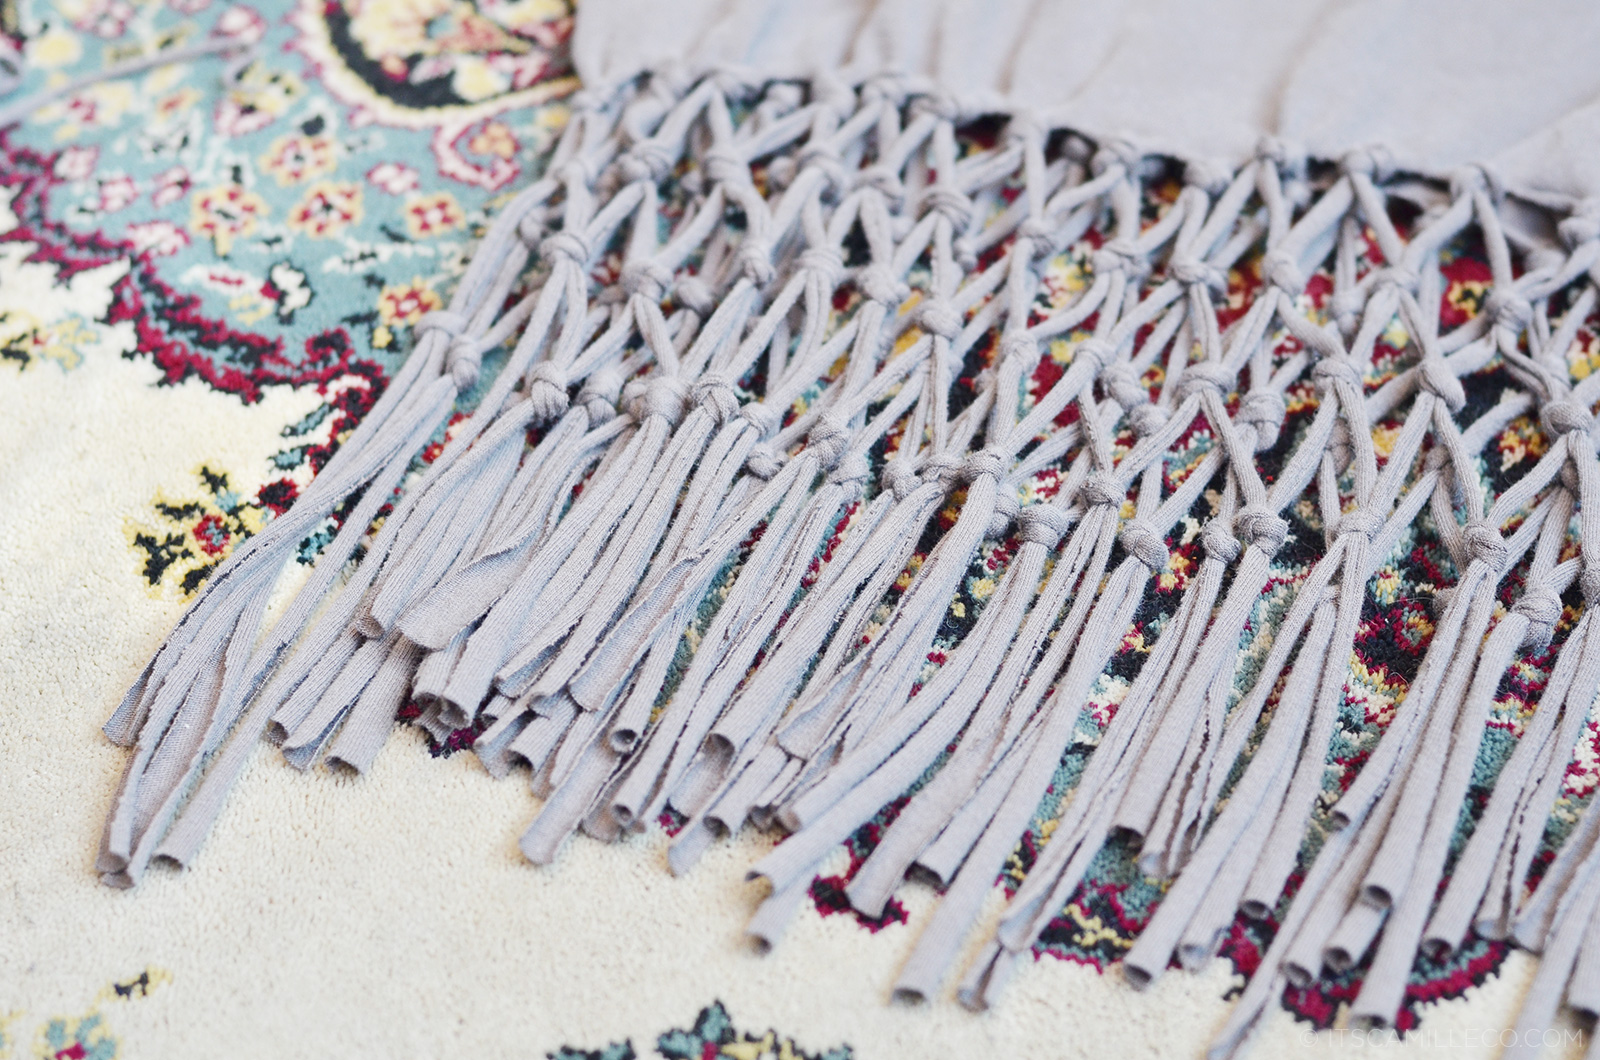
Step #6: To transform your fringe shirt into a fishnet shirt, start by tying 2 strings together in a knot.
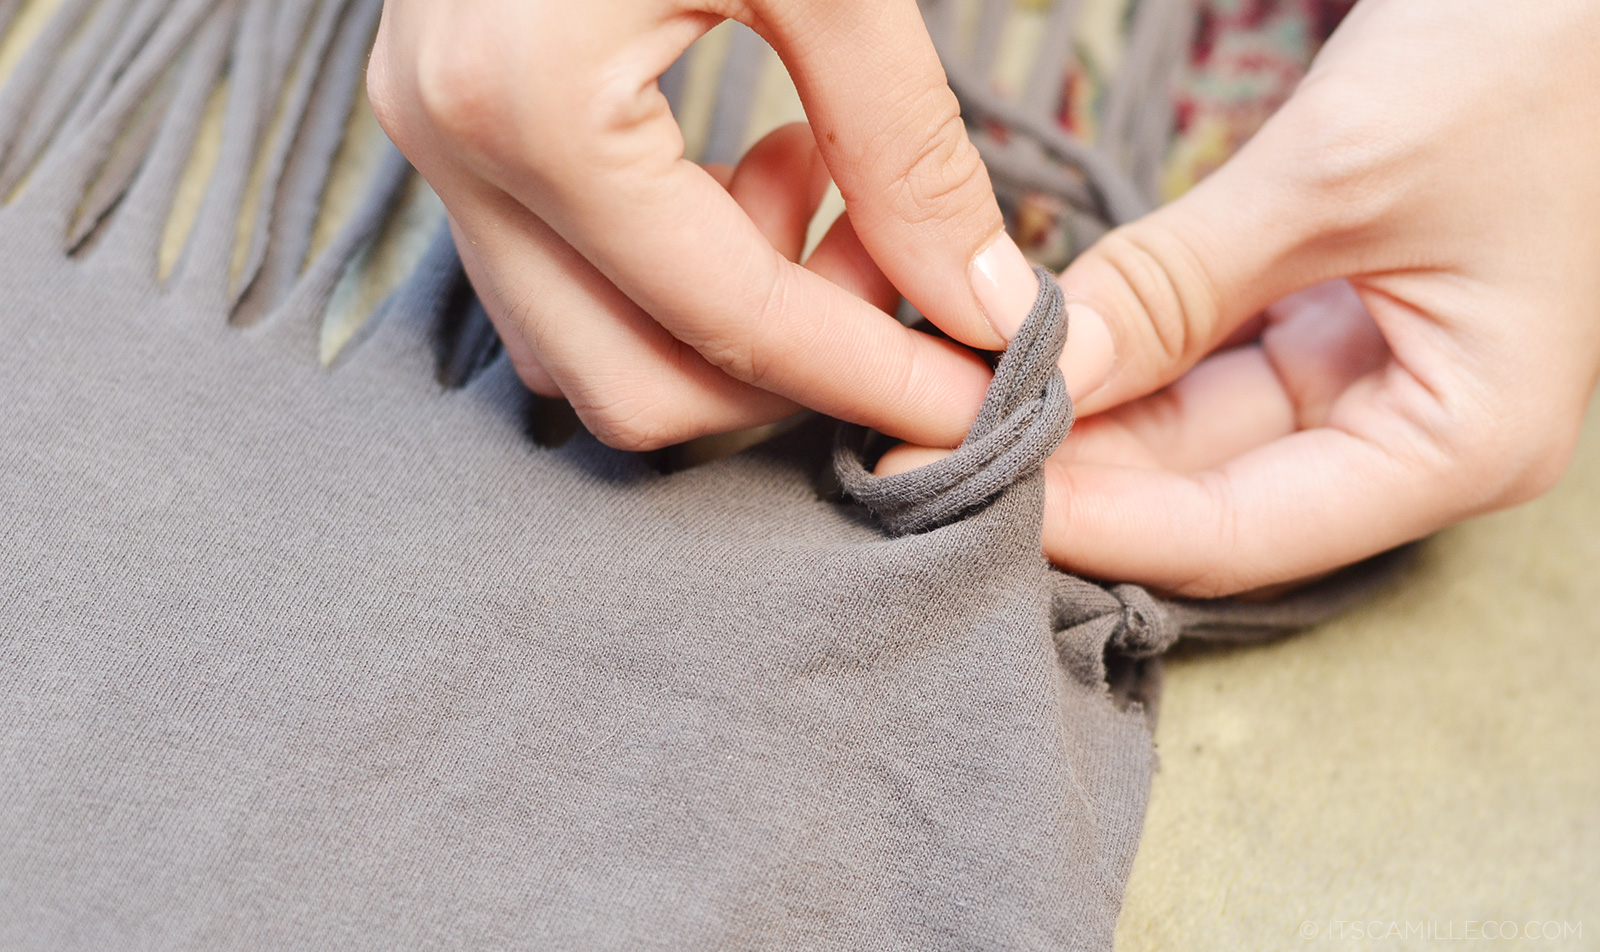
Keep going until you finish all the fringes.
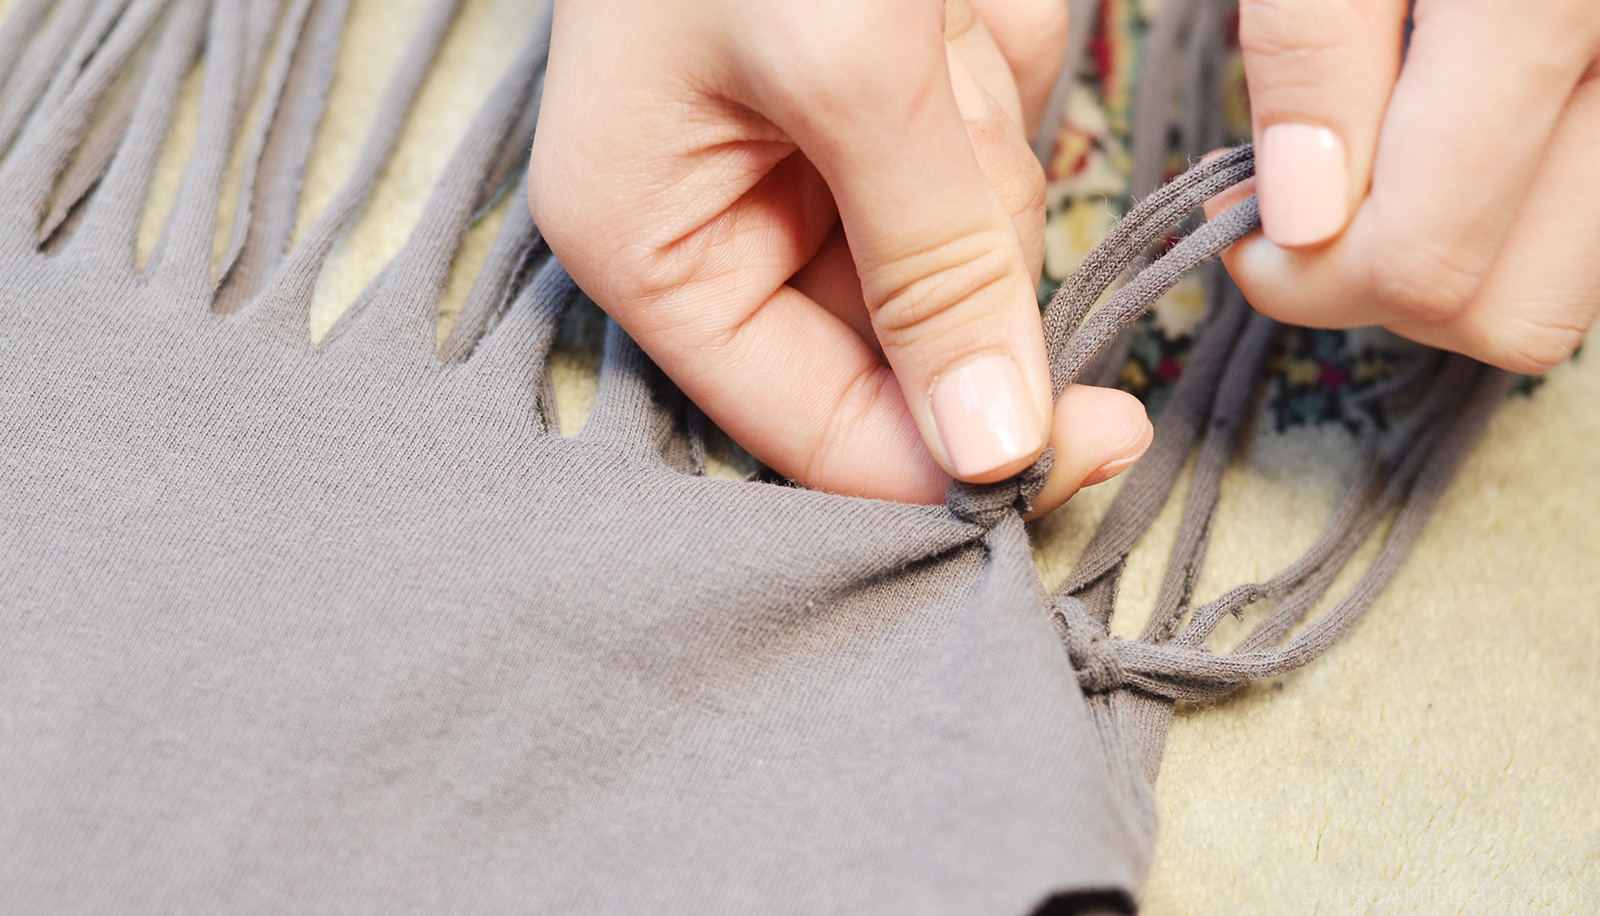
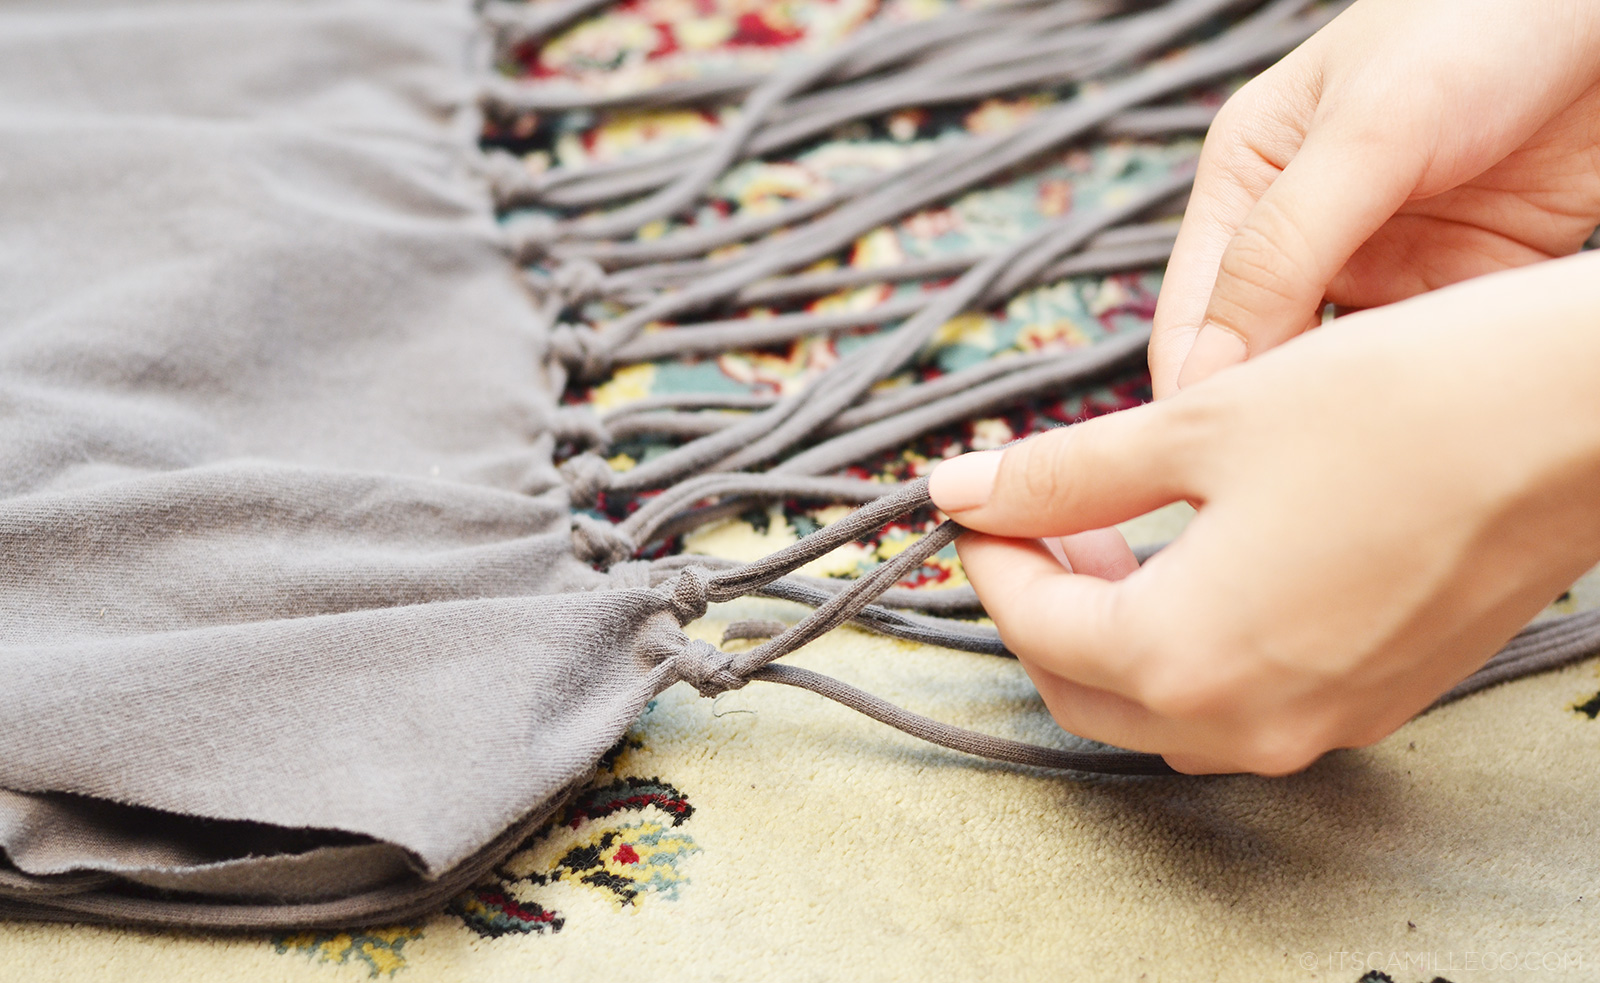
Step #7: For the second and succeeding level of knots, get one string from the first knot and another from the second knot and tie them together. Then get the remaining string from the second knot and another string from the third knot and tie them together and so on and so forth.
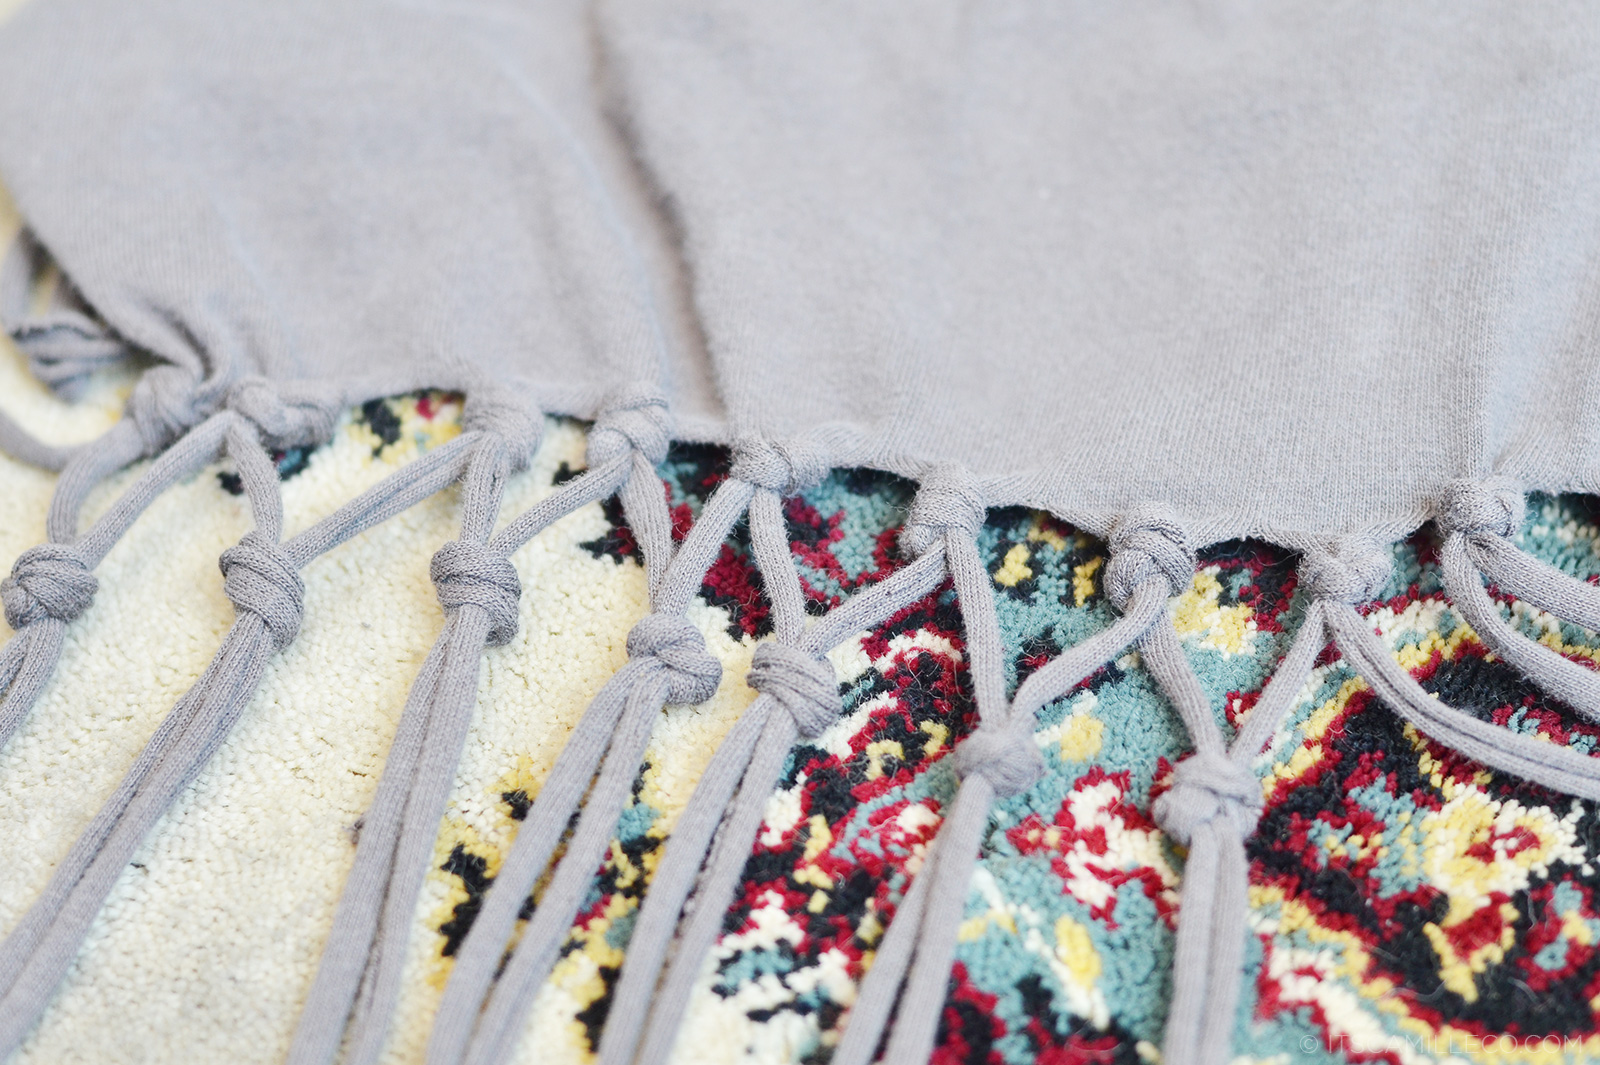
Keep doing this until you finish all the strings.
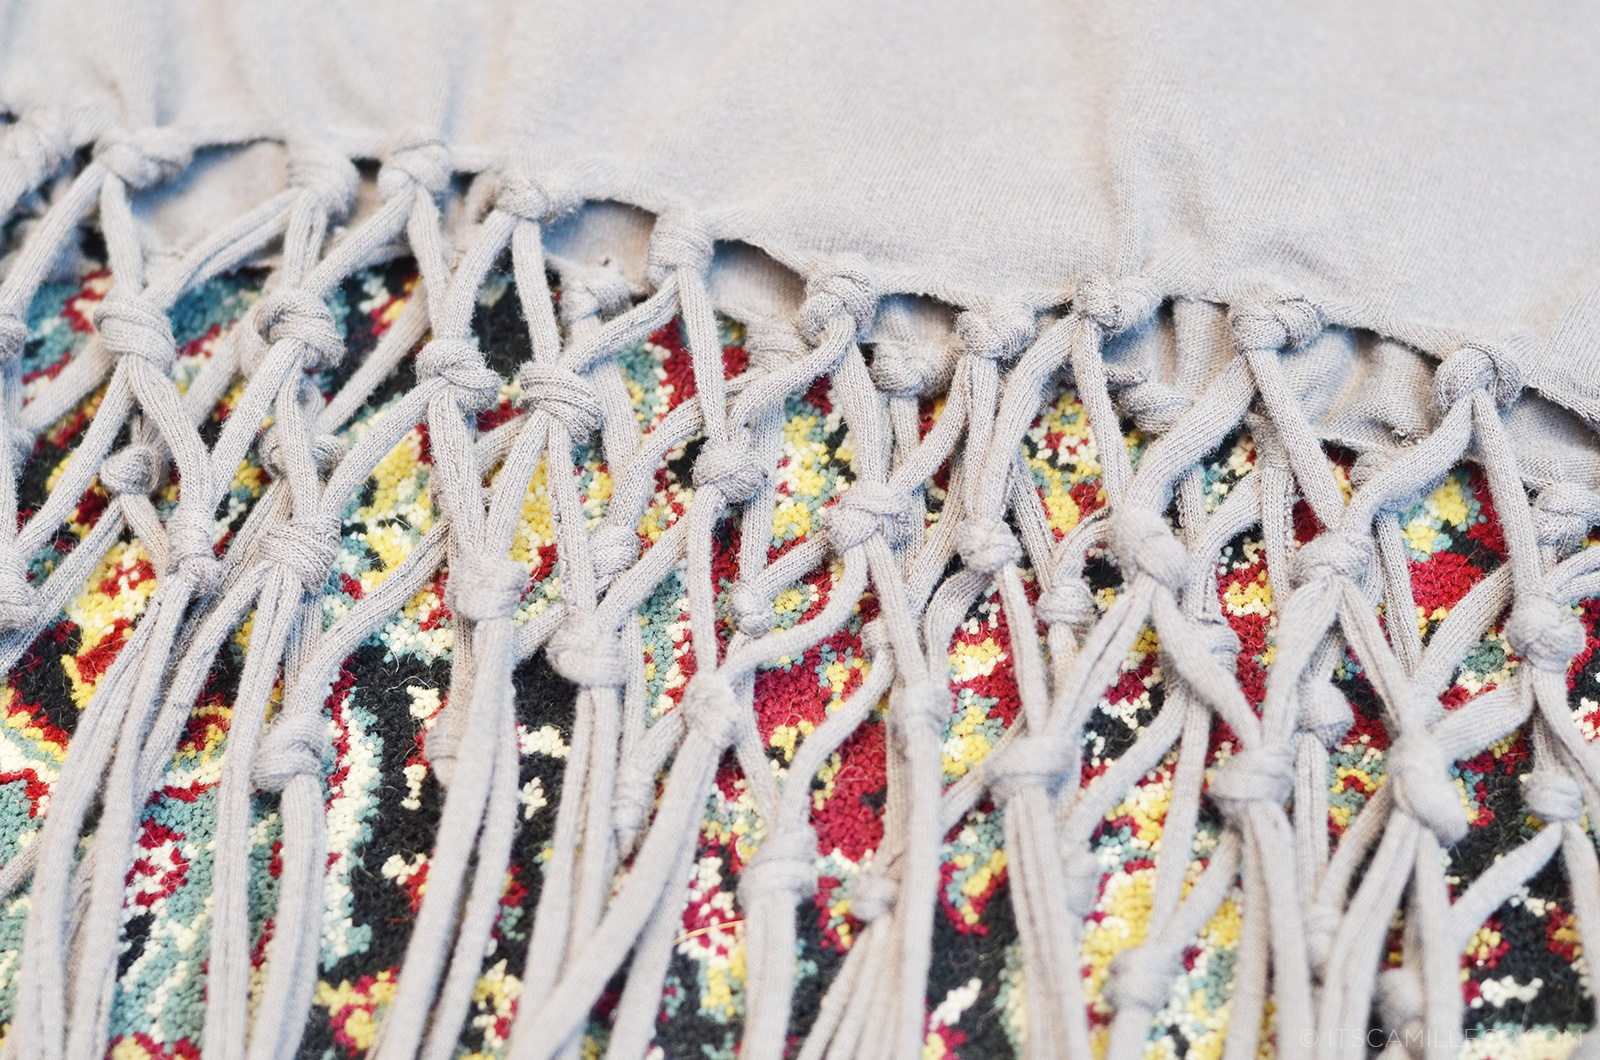
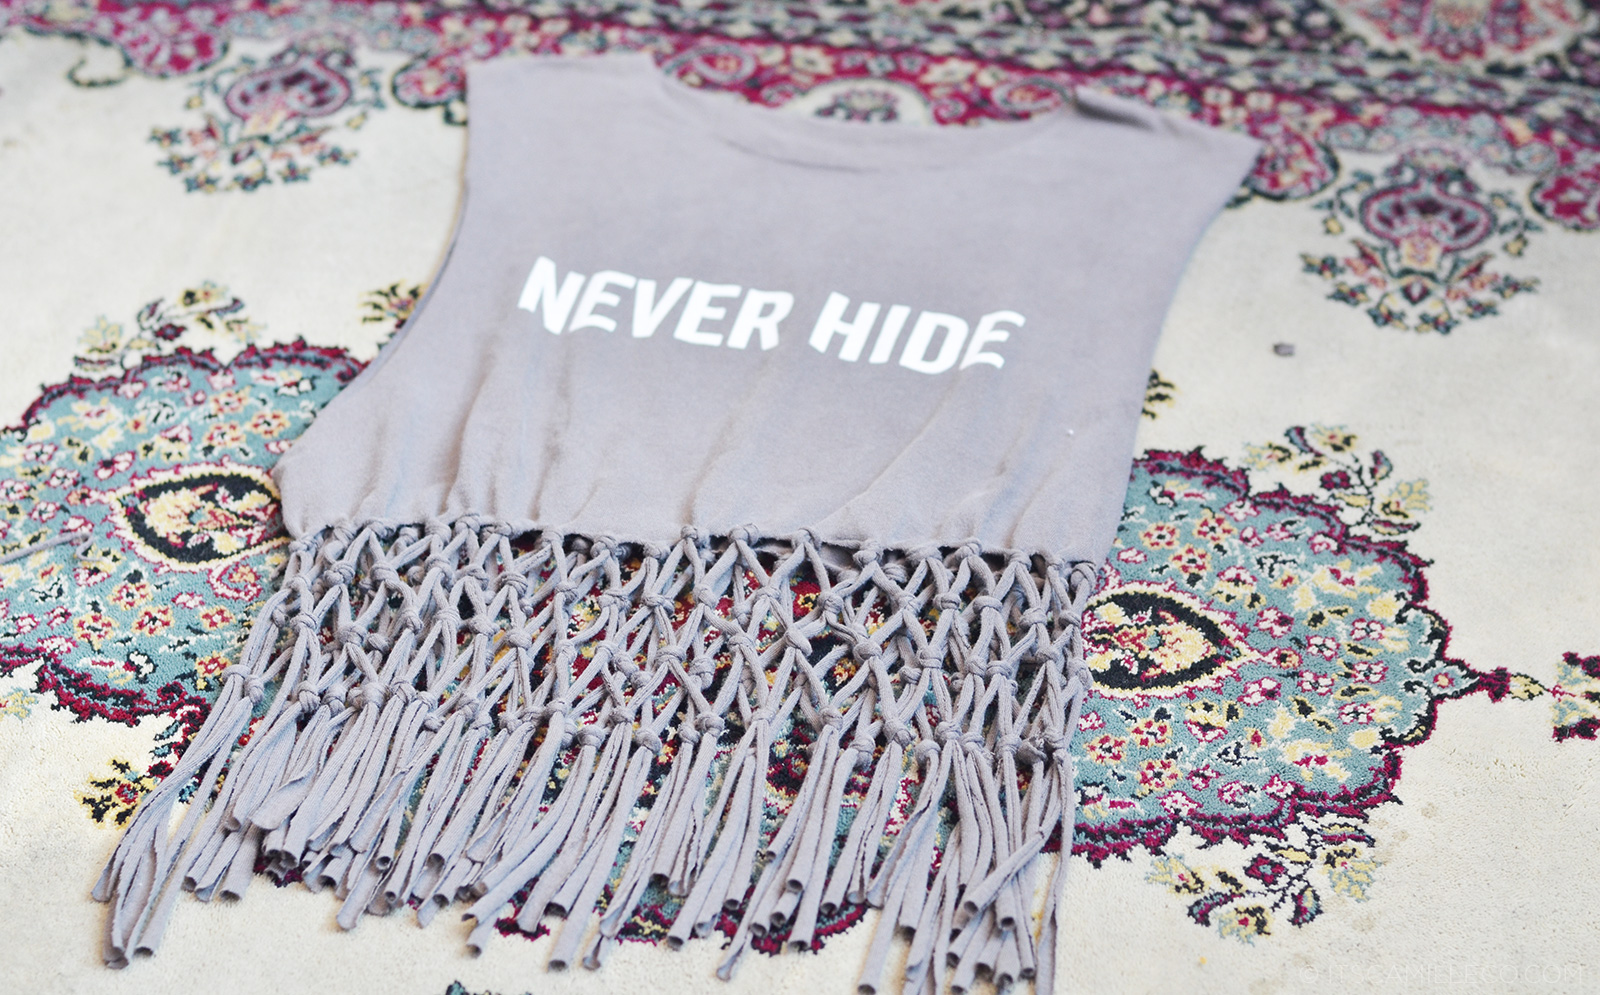
Step #8: Leave the bottom part of the strings as they are to create a fringe hem.
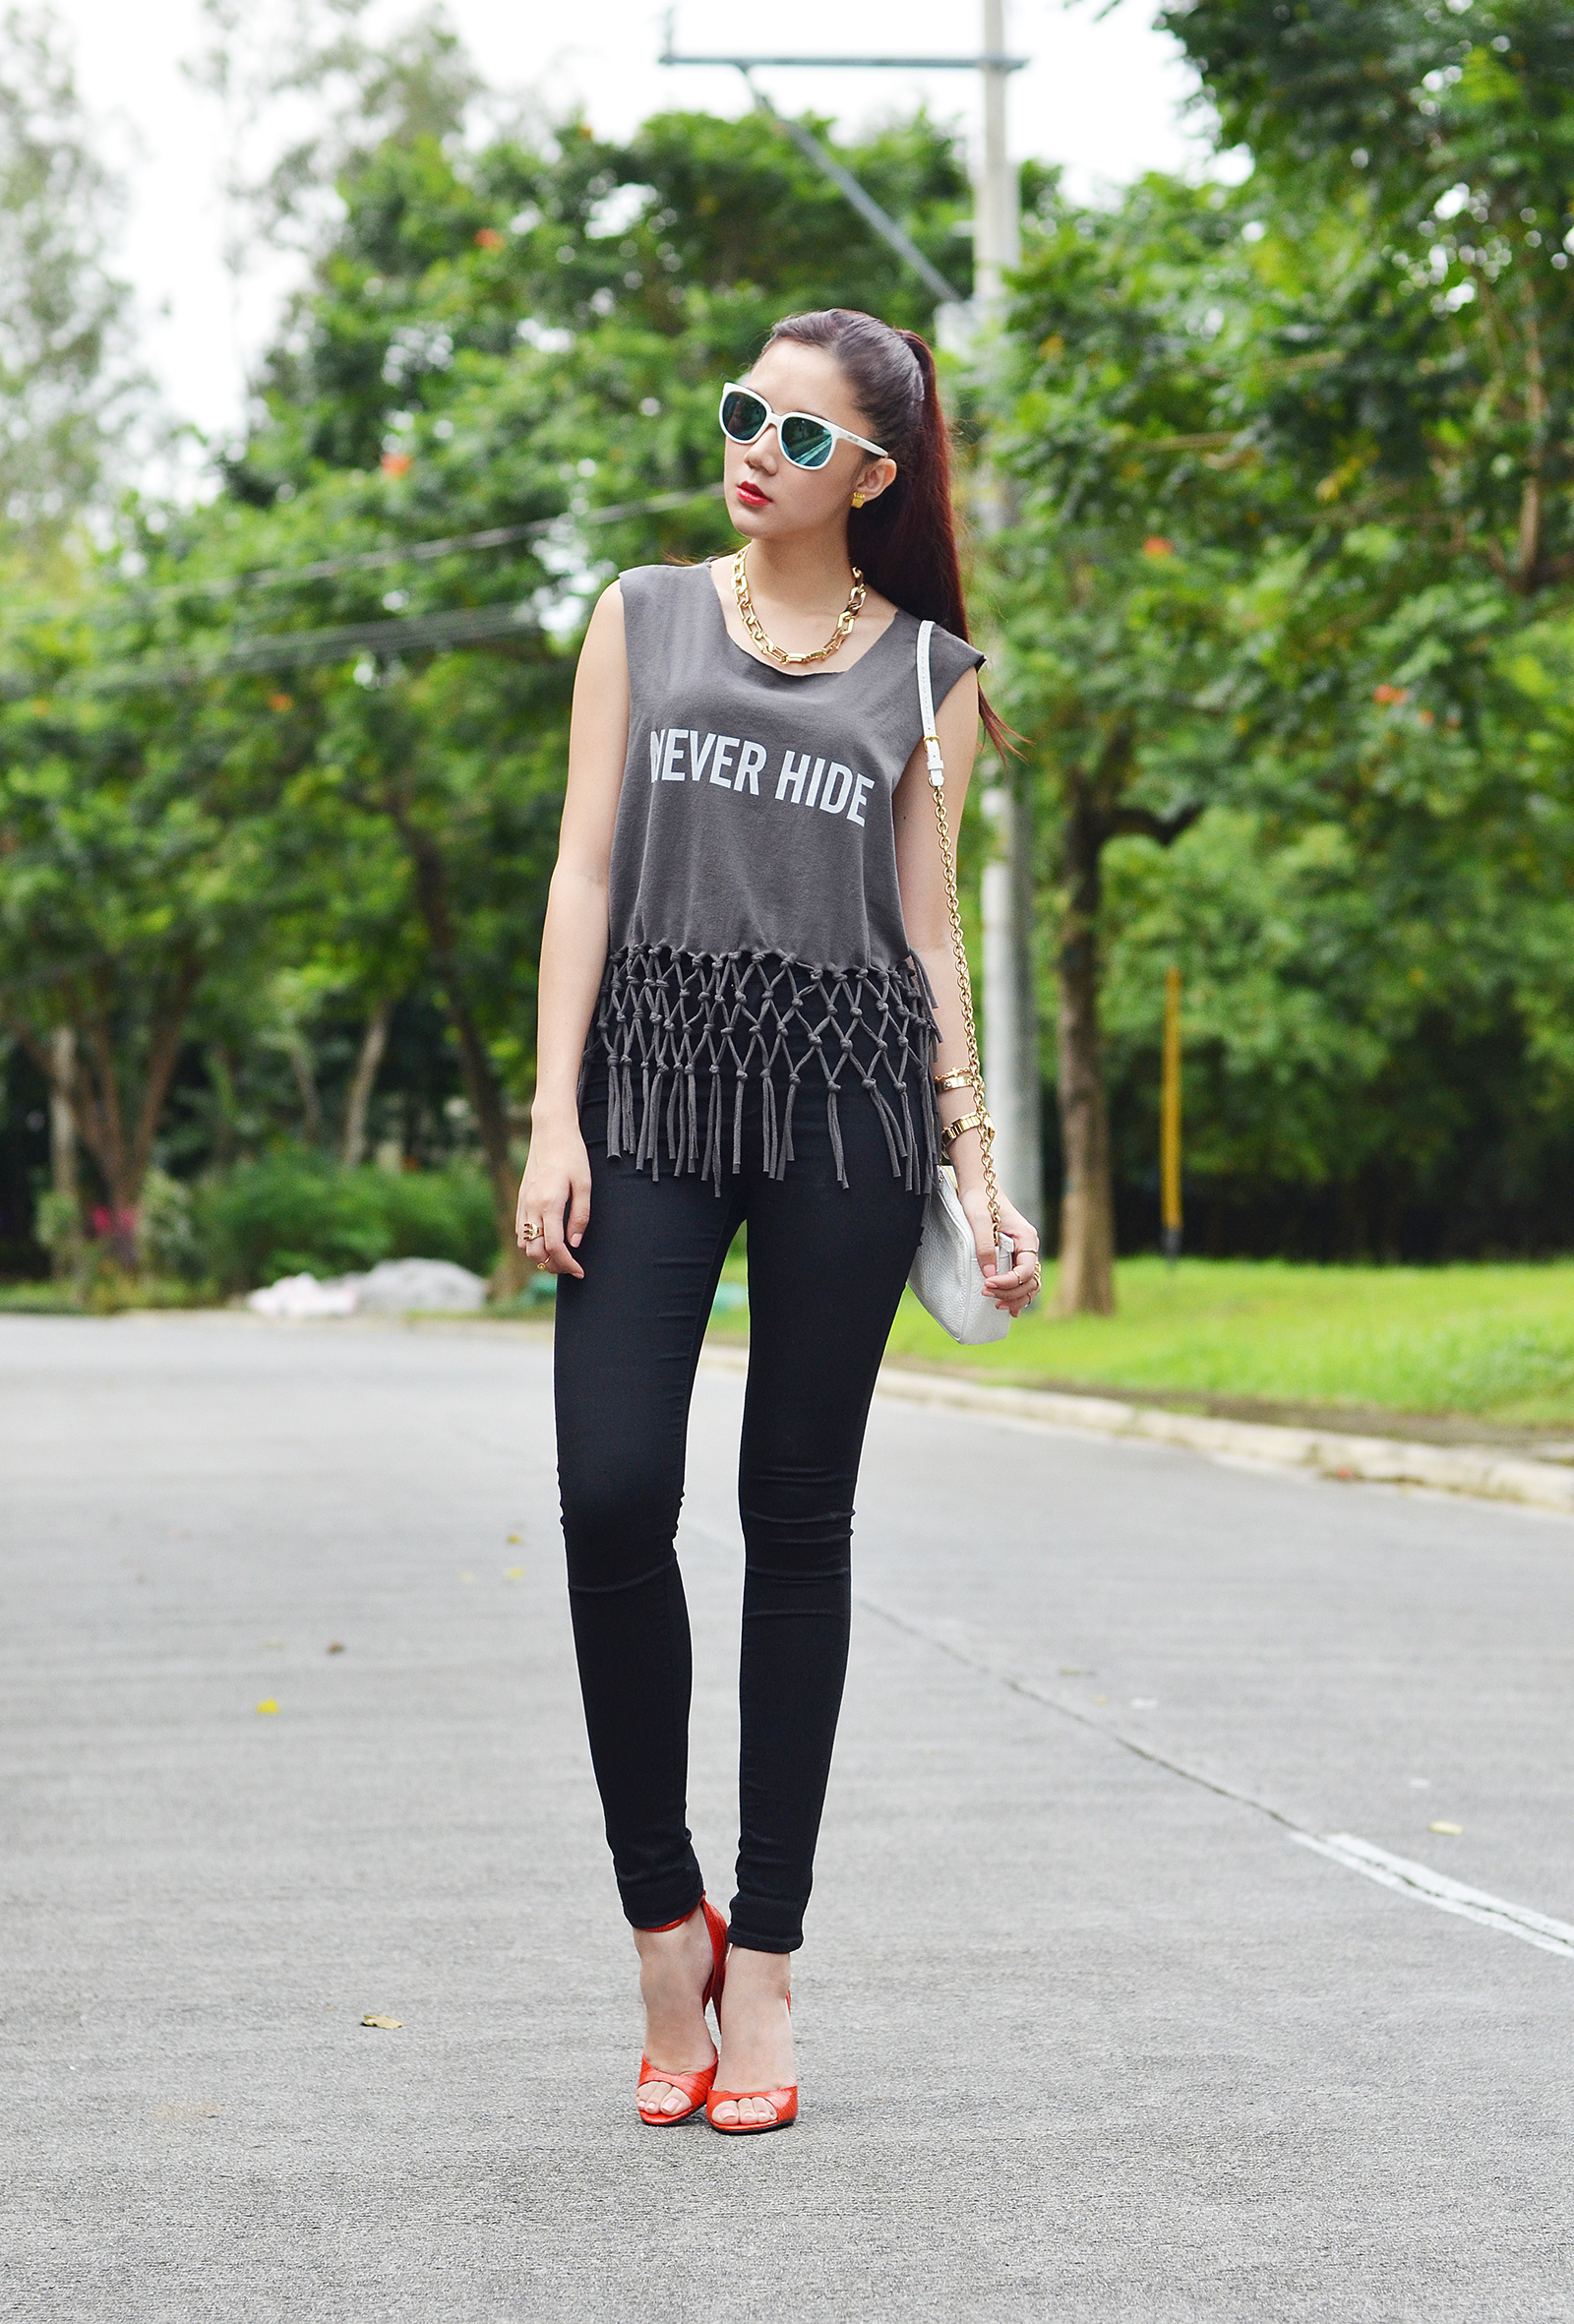
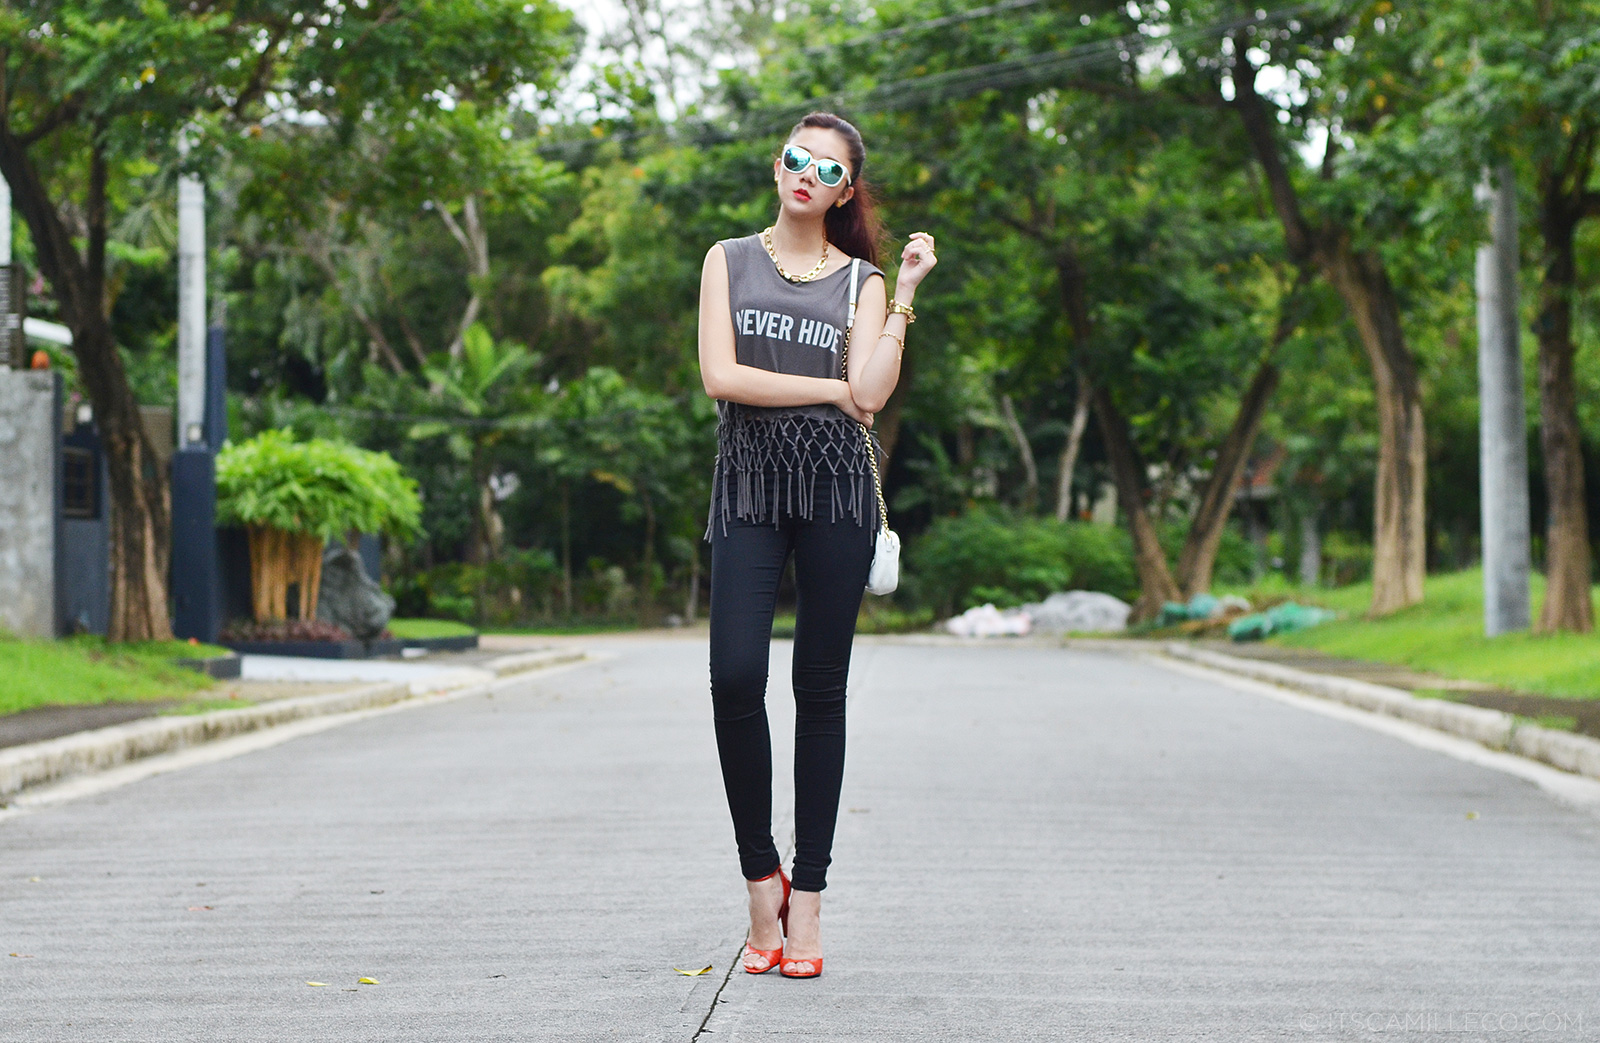
And that’s it! From a normal shirt to a muscle tee to a fringe muscle tee and finally, to a fishnet muscle tee! Wear this trendy design on a casual day out with your friends or at a music festival or even to the beach! I chose to wear it on a chill Sunday out with my siblings. It was a hot and sunny day so it was the perfect time to debut my DIY project!
[button link=”http://lookbook.nu/look/5419084-Diy-Fringe-And-Fishnet” size=”small” bg_color=”#e5b3b9″ window=”yes”]Hype this look at Lookbook.nu here[/button]
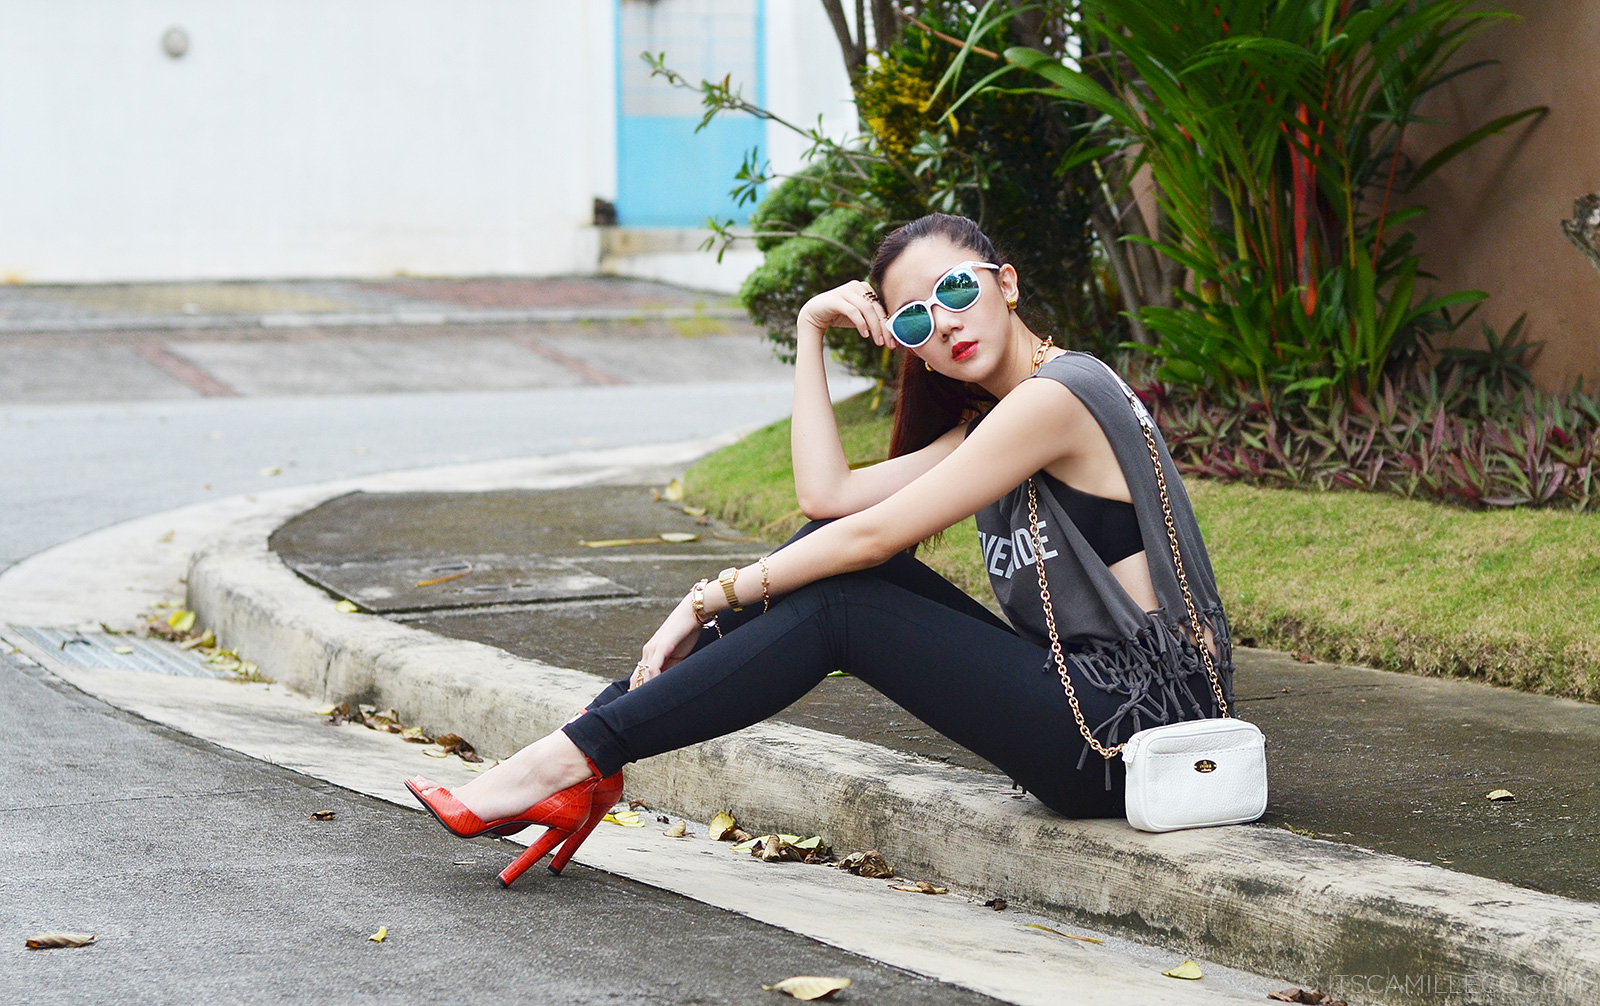
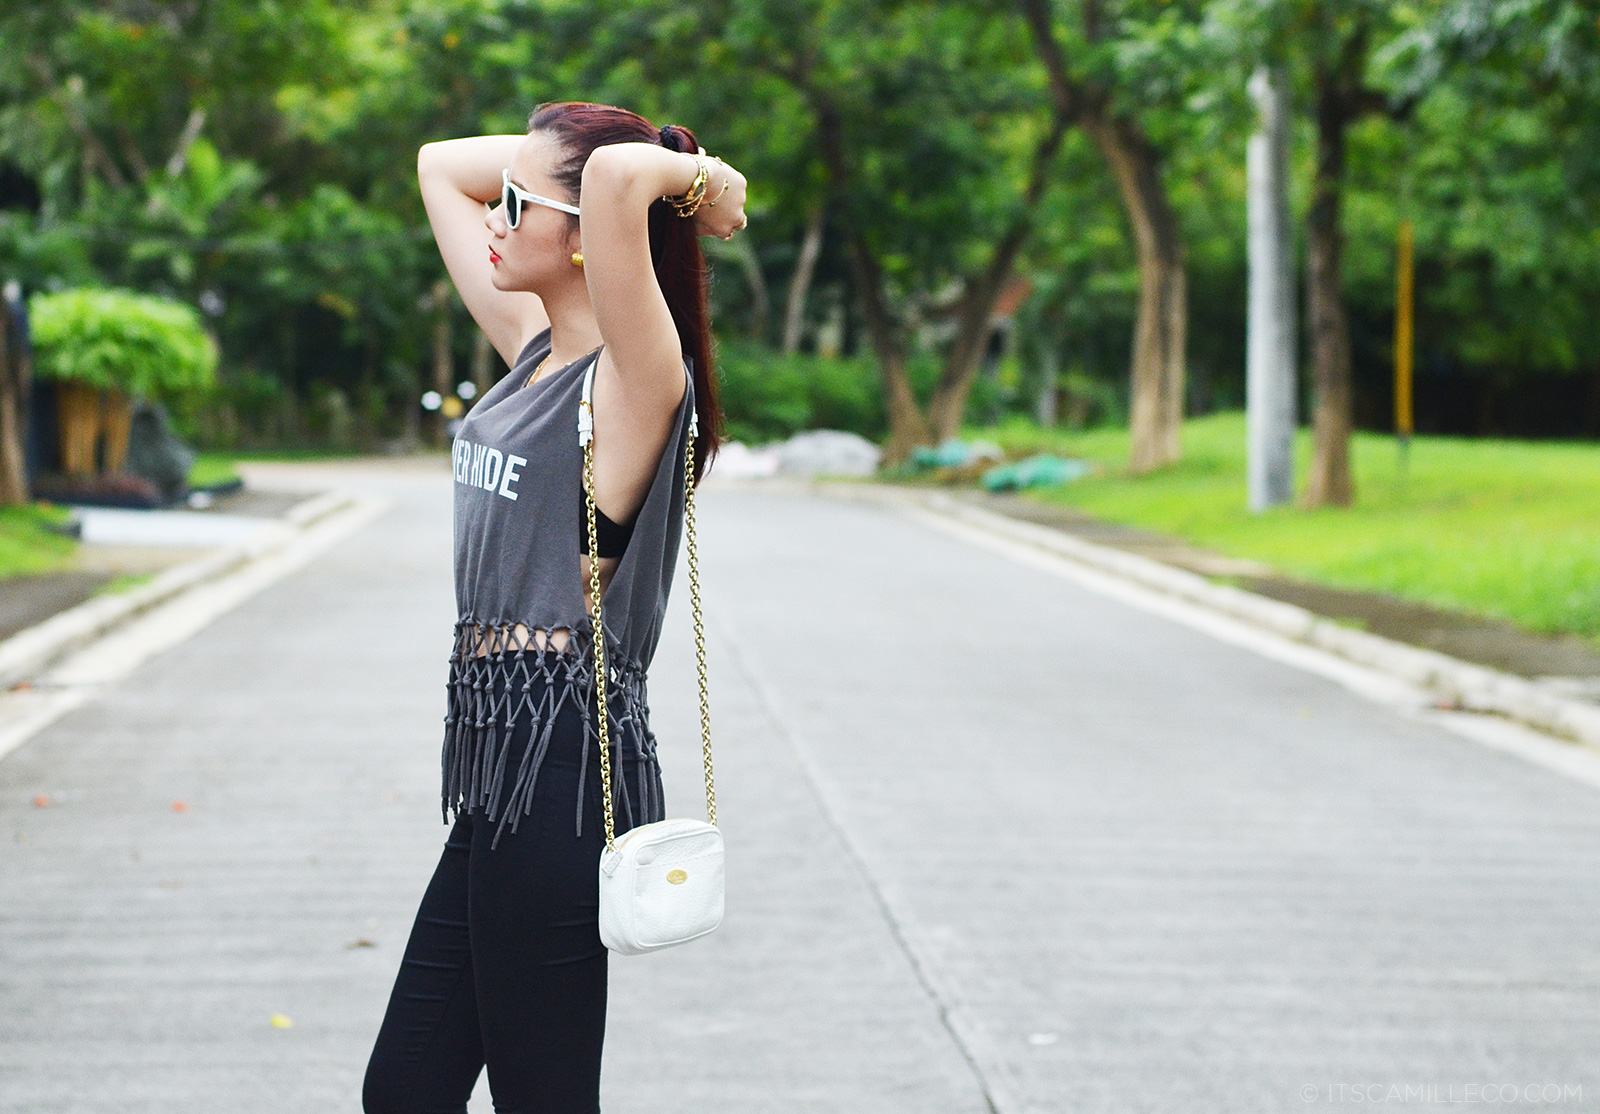
Topshop jeans
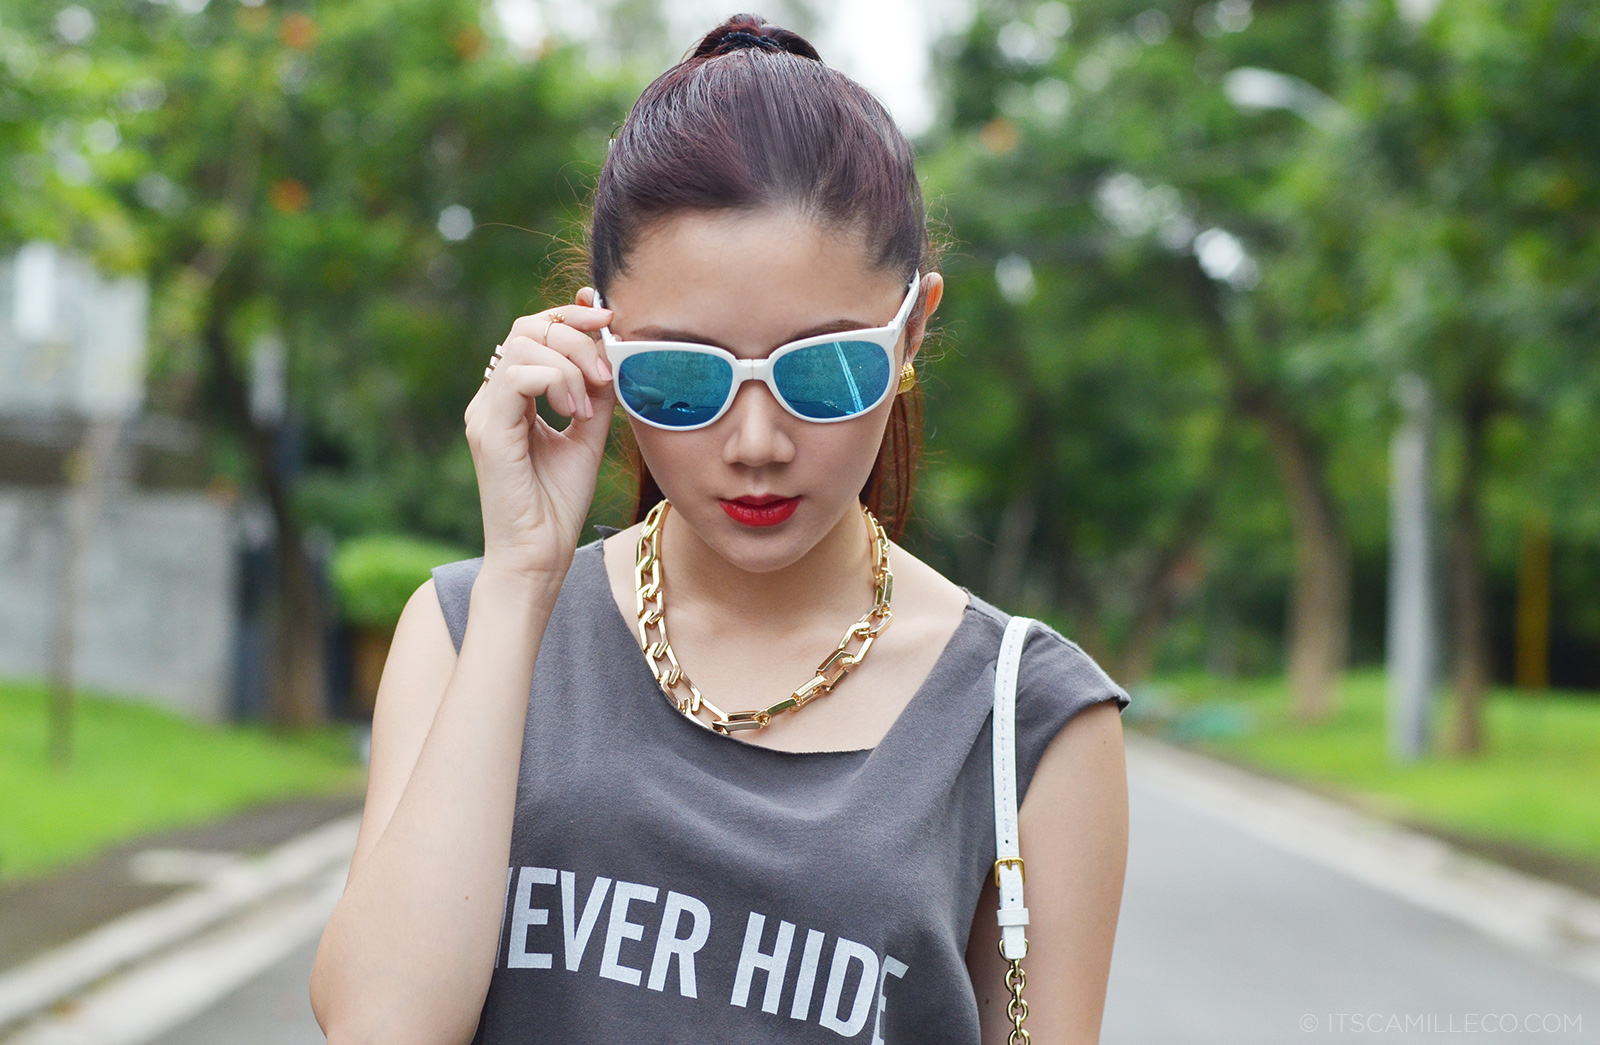
Sunpocket sunnies
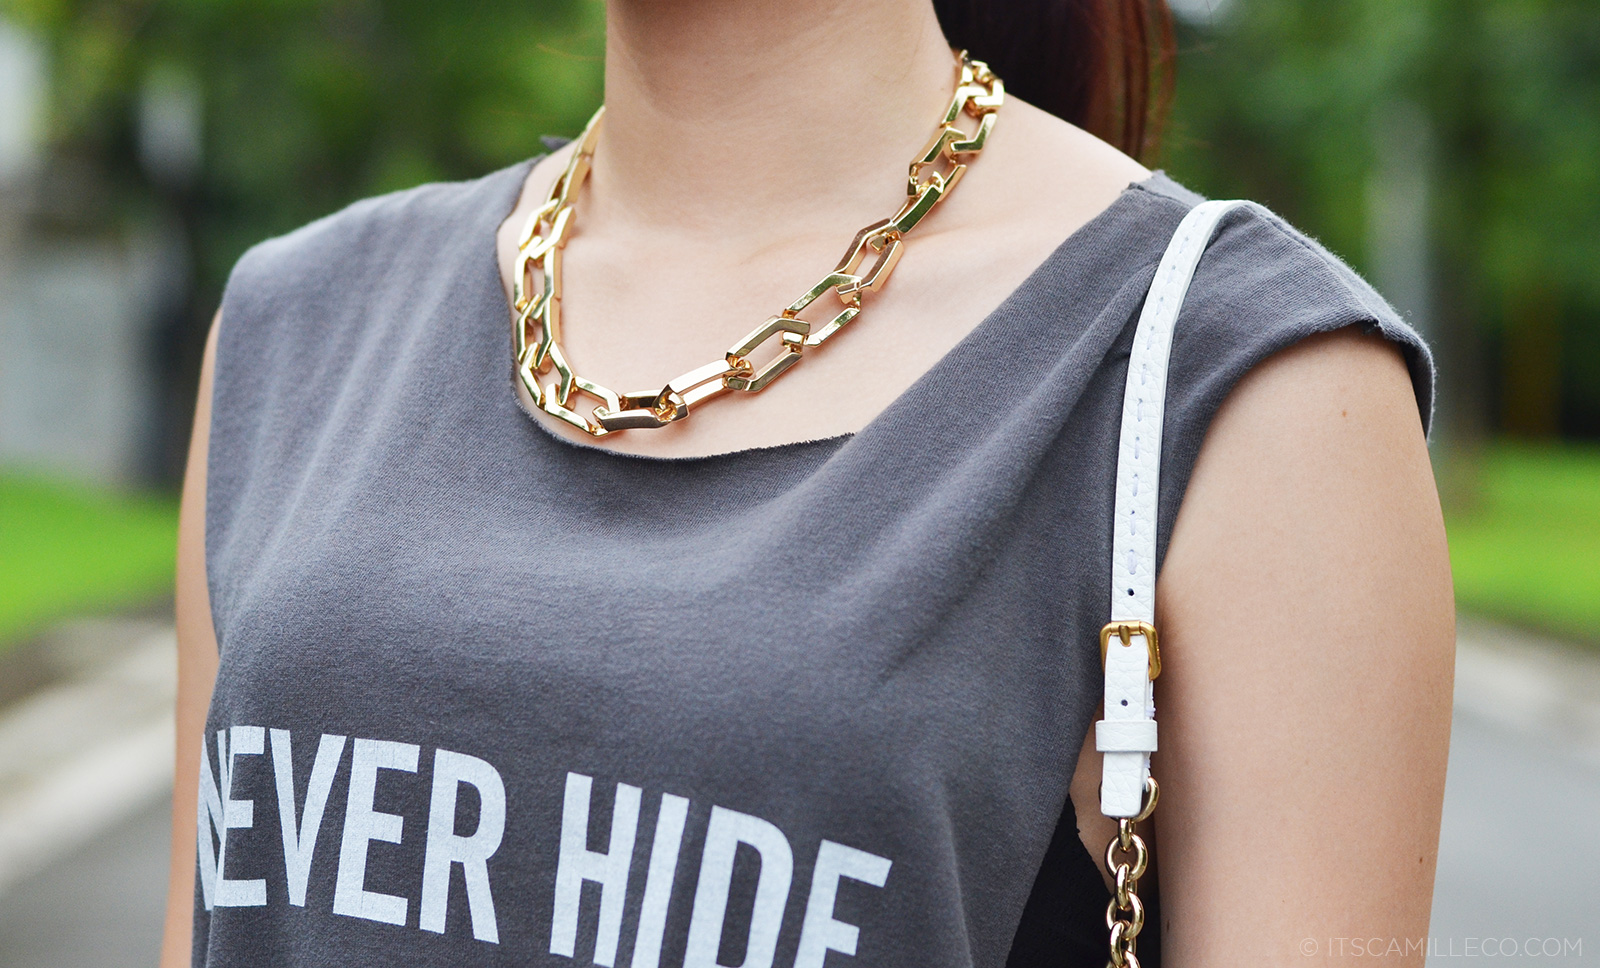
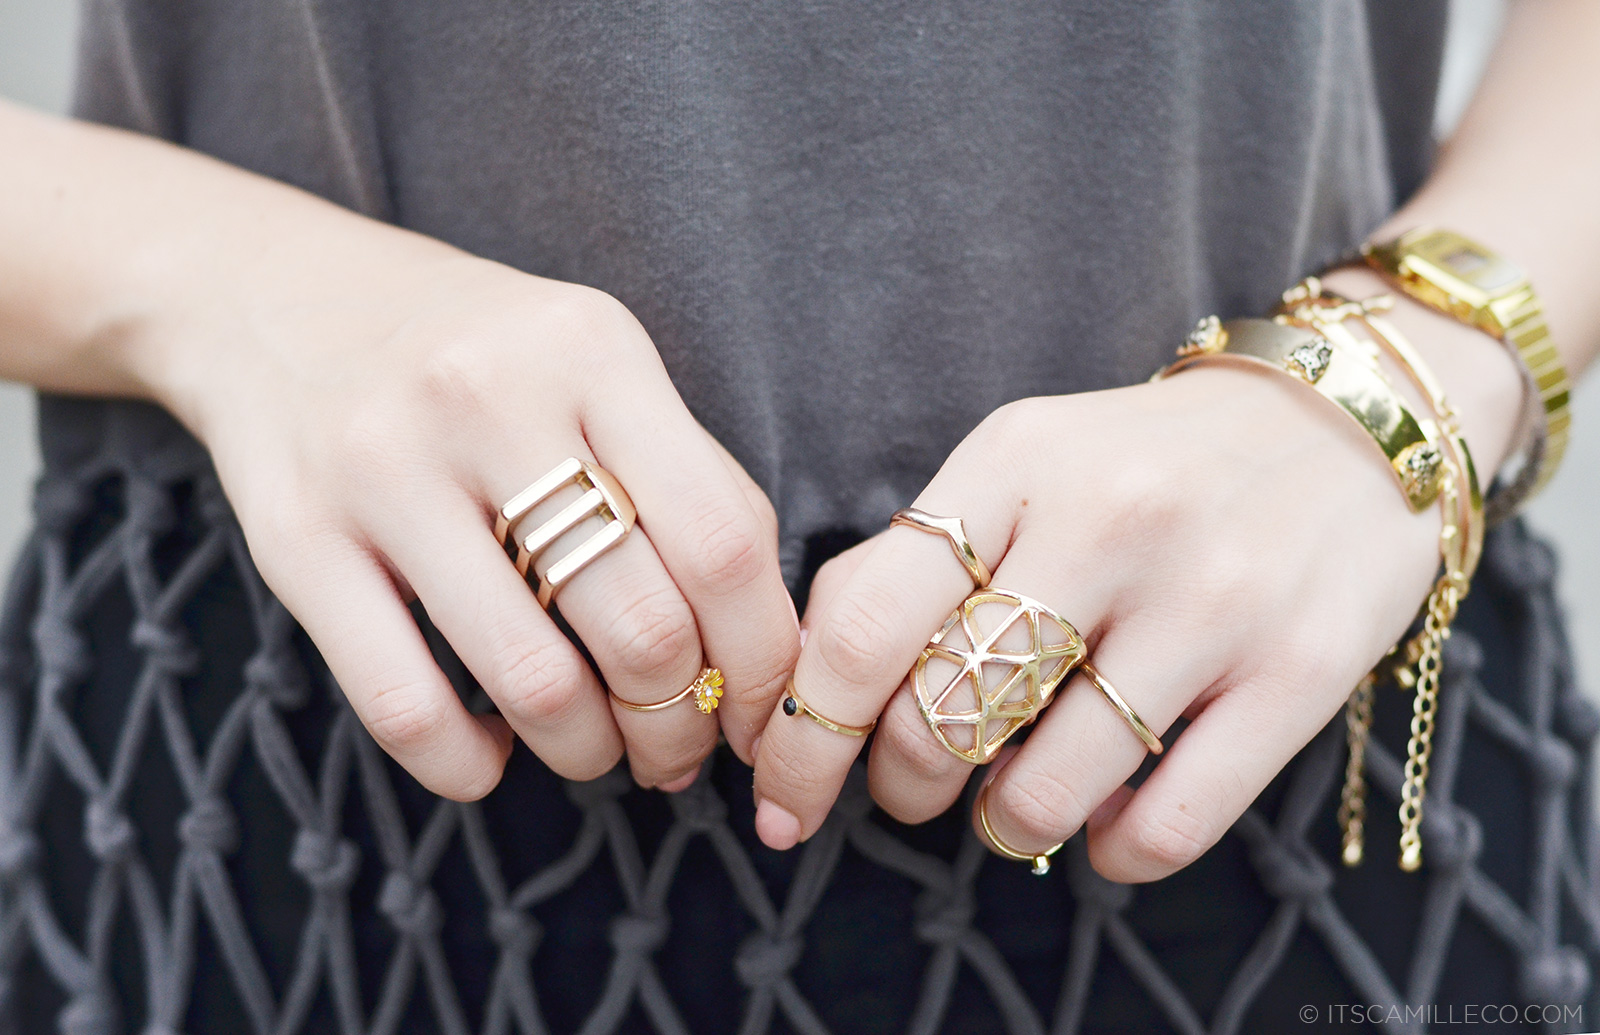
H&M necklace
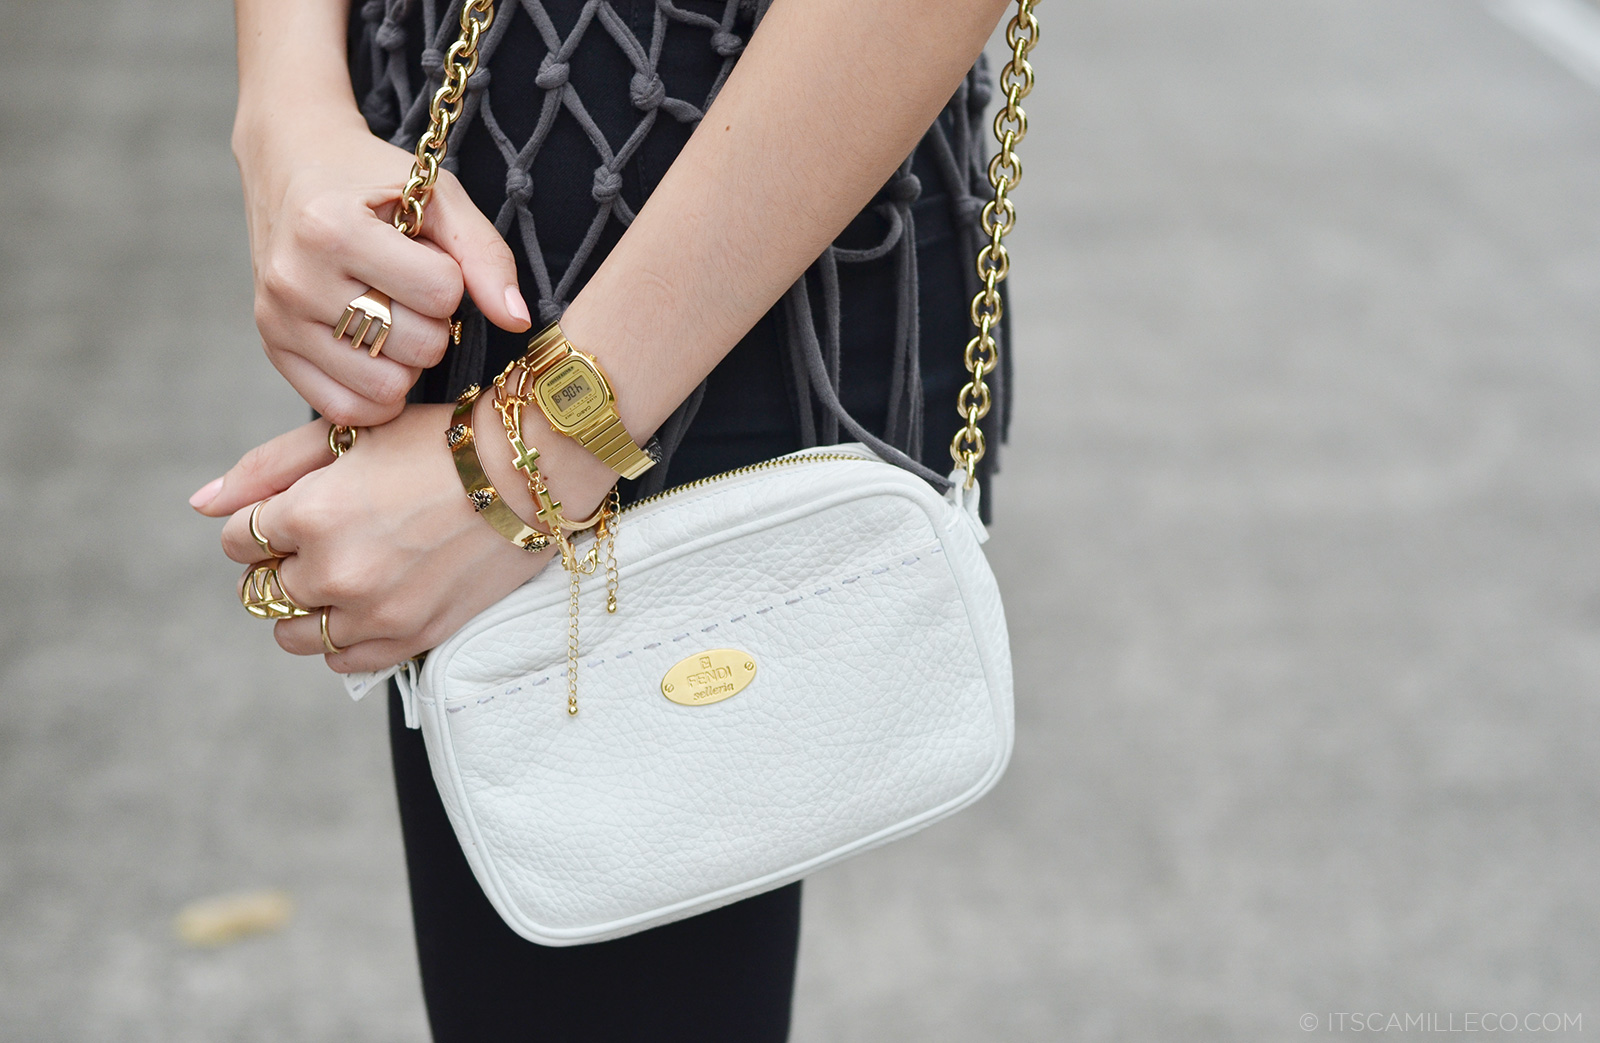
Fendi bag
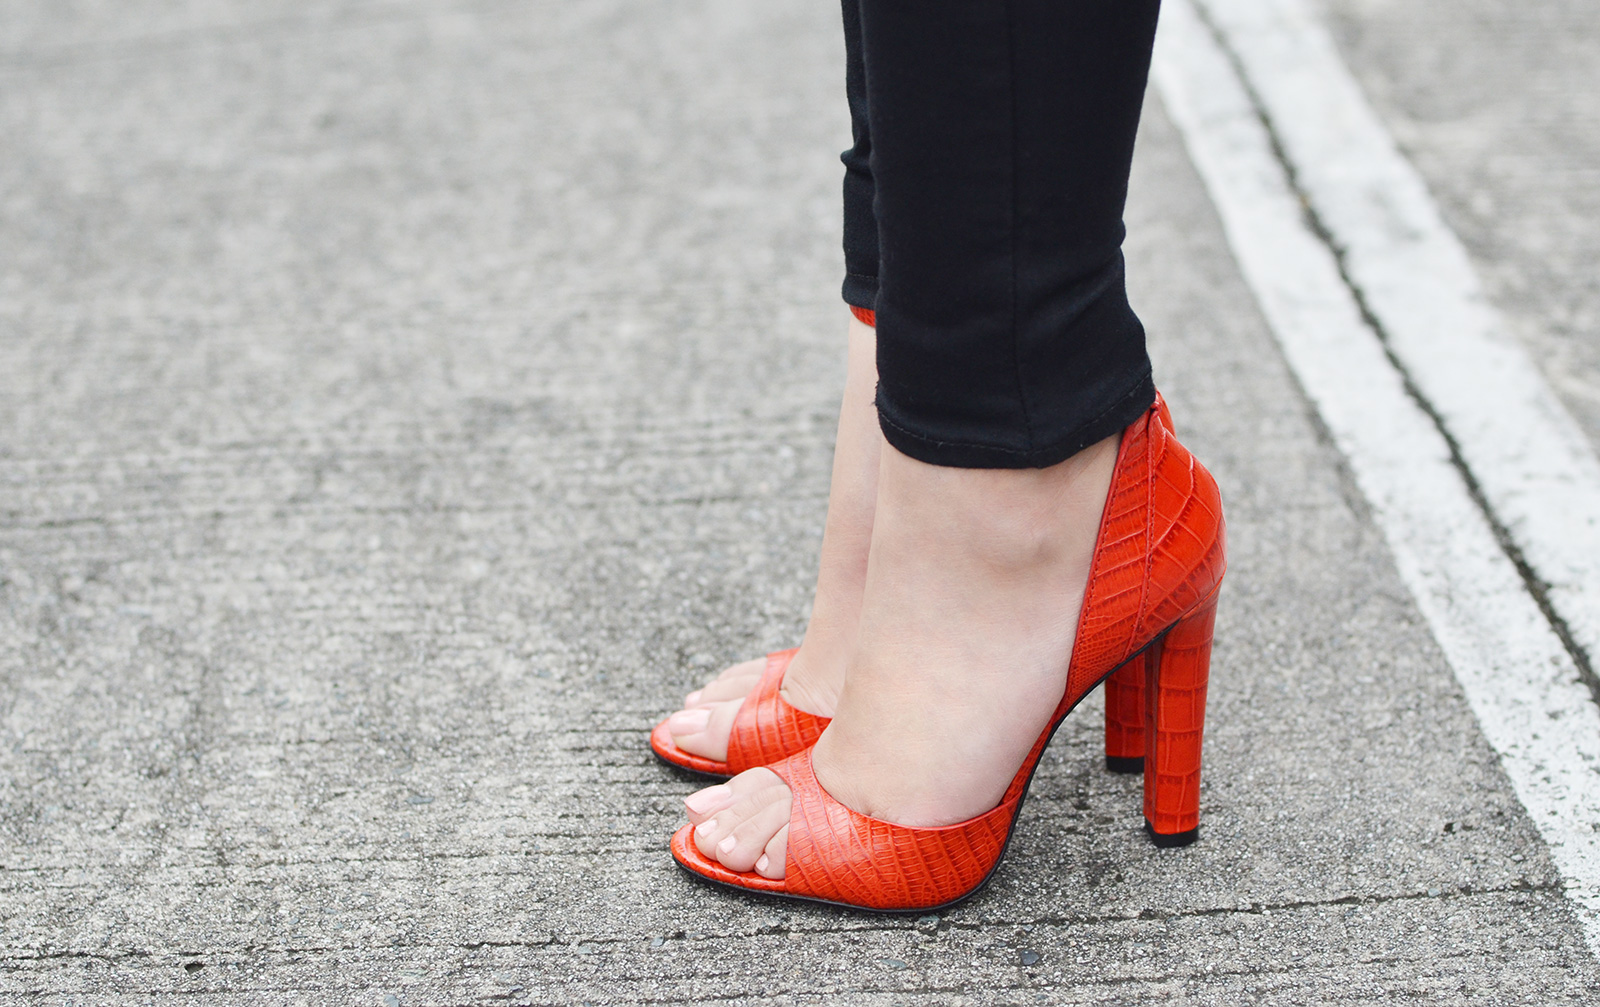
Alexander Wang heels
This is just awesome ;)
Thanks Rej!
Cool! Hope to see more DIYs ate Camille :))) You always give new ideas and styles. No more boring shirts ;)
I promise to search for more dIY ideas and hopefully share them here! :)
Wow, Ms. Camille! Bigla tuloy akong napaisip dun sa iba kong tees. Thank you for this post! Good thing I visited your blog again. The last time I checked this was a month ago! Grabe. Ang dami kong namiss. Hahaha. Keep it up, Ms. Camille! And more D.I.Y. posts, puh-leaseeee. :)
Whyyyyyy!!! One month is too long! :( But thank you for visiting again. Sana you vist more often! :) If you do, I’ll post more DIY haha!
Thks for sharing this helpful tips. I’m going to do this :) I really Love all of your styles
Thanks Chloe! :)
Hi, Camille! I just wanna know how are you able to walk in heels and also, how long? TIPS TIPS? :)
Thanks! Love love love this entire space! :)
LOL! It’s a challenge for me too so I don’t think I’m the best person to give tips! Haha! :)
I was never a fan of DIY clothes because I seem to suck at it. But this one convinced me that there’s still hope for me! Thanks! :D
There is hope! ALWAYS!
This is sooooo cool!! I love it!! I’m gonna start stealing my brother’s shirts hahahaha :D :P
Haha! Go for it!
Supportive talaga? hahaha :D He wants to meet you too btw <3
Awwww cute niyo!
Haha! He knows how much of a fangirl i am kasi hahaha :D And he saw your blog na and some of your designs on IG, he loved them! His friend is also a fan of yours :))))
Yay! More guy readers!
Thanks for the DIY post. I’ve been dying to have this. :) I will definitely do it! :)
Enjoy! :)
I love this blog post!! will try this during my free time!! :)
Go for it!
such a nice DIY! :) I’m so excited to go home from work and do some funky DIY with my unused loose shirts. teeheeeeee :D
Woohoo! I hope it goes well! :)
Love what you did to the shirt, would be trying it out myself.
http://thinkworkandgo.blogspot.com
Thanks Chiamaka! Enjoy! :)
Cool DIY ate camille :)
Thanks Jheanna!
Wow your so creative :)
Thanks Rochin! :)
Thaaaank You Lord! hahahahaha!!! I’m soooooo going to try this out! Thank you Cams! :)
You’re welcome reena!
wow you are effortless Camille!
Will definitely try it!
Thanks ohms!
SUPER LOVE THE OUTFITS
SOMETHING REAL SERIOUS
Thank you ollyvia!
Cool DIY! Hitting three birds with one stone, haha. Anyhoo, I love your outfit! Well, nothing new, it is always the case, you are just too fahiowwwn and gorgeous!!! And you always have the most beautiful shoes, very imeldific! haha. LOVE <3
Imeldific! LOL! Thank you Mariel! :)
Going to do this next summer :)) hihi excited.i like your heels <3
http://itsgracebala.blogspot.ca/
Thanks Grace!
Hi, Camille. Really cute and super practical to do a t-shirt, I will try. Dyed after you ready? In DIY it seems so much more clear.
Try it! :)
mind if I ask the brand of your pants or is it leggings? <3 it! and of course I also love what u did to the shirt :)
Topshop! :) Forgot to credit :)
Loooove love love the shirt and your glasses. We are trying to mimic the shirt now as I comment. Thanks for sharing. Great idea from 3girls1apple.com
Thanks! I hope it turns out great!
Nice! DIY clothes can make a person stand-out. Thank you for sharing :)
You’re welcome! :)
I’ll do this to one of my shirts for our next dance performance. Thanks for the idea! ;)
Awesome! You’re welcome :)
Perfect DIY! Kung ako gagawa nyan.. Maybe it wont look like that!
I have the same sunnies as yours!!! Cool!
It will! Super easy! :)
wow ms. camille. thank you for sharing this with us. i’m so gonna try that. :)
Go for it!
Those AW heels 8) Was this the pic on IG that you made selfie? Cutie
Thanks Ren! I did take a photo of these shoes :)
Ang taray! haha
I hope you make more DIY. I’m looking forward to all of it :)
Thanks Emmrose! I will :)
Love it. Super cool! :D
Thanks Shannie!
What a great way to reuse those old tees! Gonna try it x
ravenmaidenmaven.blogspot.com
It is! :) Go for it!
Wow, I love this idea!
http://this-exquisite-world.blogspot.com/
Thank you!
<3 i'm in love thanks 4 sharing :)
http://www.mariezamboli.com
http://www.mariezamboli.com
You’re welcome Marie!
The tee looks so pretty. You are very good at it Camille. You make it look so simple and easy but i am sure when i try it, it will be a bit difficult. I will have to keep at least x3 shirts to master it.
your cut is also so clean, after all you are a designer so you know what you are doing.
I will try and BTW, i received my Sheer Perfection Dress and Print Paradise top and i absolutely love and amazed at the quality of the fabric. Oh, i also receive your bow necklace, so it definitely made my day. even my mum loved it.
A big thank you to you and the Tomato team who sent me a small note and a voucher all the way to UK.
Naaj Ronas Lifestyle
Thank you Naaj! I’m so happy you received them already! :) And don’t you worry, I’m sure you’ll able to execute this DIY perfectly! :)
I loooove how you tied the fringe. It’s so intricate and unique. Great post! Thanks for sharing this, Camille
xoxo Zoe
http://www.thatszoe.blogspot.com
Thank you Zoe!
Hi Camille!
You look so effortlessly beautiful… Big fan here
Thanks Camelle!
So that’s how you do it. Thanks for sharing! I feel like I’m also a designer haha….. Looking forward for your next DIY post. (*_*)
Everyone can do this! :)
Sorry to ask this but,What brand of bra are you wearing in this post?
A normal black bra :)
Wow! I want to try it, too! but I think, I won’t make the armhole too big, unless I wear a tank top underneath. hehe. It’s my sem break in a week and I’ll let you know if I made one! thank you for this, Miss Camille! :)
All up to you! :) Show me your version! :)
THIS IS MAJOR!
Maj!!! LOL!
Woah, that was very nice and sexy! And it’s easy to make one. clap clap clap, thank you for sharing this :)
It is super easy! :) Thanks Judy!
Really really nice !!! Thanks for sharing :D <3
My pleasure :)
Camille you are truly inspiring!
Hope I can visit Php someday and meet you!
kisses from indonesia :*
Wulan Wu on http://bootsydoopsy.blogspot.com/
Thank you Wulan! :) You’ll love Manila!
could you makes more diy please
Yes I will!
Soooo cute!! :) More DIYs to come, please ate Cams! ^__^ (Ate daw??? Close? Haha. Sorry. :D)
Haha! Yes! For sure!
Such a great DIY post, Ms Camille! But i’m bad at DIY and craft.. sobs.. and I’m a bit lazy.. LOL.. and finally you wear your Alexander Wang’s heels! =D And you totally got the swag with this muscle tee on! Cool~ =)
Thanks Christine! Why don’t you get a friend to help you out so that it’ll be more fun and won’t get lazy? :) Gooo!
Oh, that’s a great idea! I never thought of that! Thanks, Ms Camille! =)
very creative and practical! ♥♥♥
Super practical! :)
Nice touch on the knots! Gonna try one for my own. Keep it up!
http://e-coupons.com.ph/
Cool fashion deals on Zalora!
Thanks Reena!
Τα γυαλιά είναι πολύ ωραία!!! ρουχα μεγάλα μεγεθη
Thank you Rouxa!
Gosh! you’re an artist :) Hihihih!
I remembered your first d.i.y at the goody event. it was so cool that you do it successfully :)
Things I learn on the internet! :)
What’s the shade of your nailmpolish in the DIY pictures? :)
Sorry I don’t know :) I had my nails done at Nail Spa Lounge By Ellabell :)
Wow! Great work! I am inspired by you! You’re really rocking this look. Just wondering, anong brand ng shirt and jeans mo. They both very nice. Thanks! :)
I got the shirt from Rayban for free and my jeans are from Topshop :)
Ooooh so THAT’s how they make those fishnet muscle tees! @o@ Learned something today! Yey! \:D/
Yay! Now you can do it too!
cool !!! thank you so much for sharing ! :-)
x
http://franchemeetsfashion.blogspot.cz/
My pleasure Carol!
I just finished checking your blog (cos i’m busy for two weeks) and then you have a new post already!! You are so masipag ate :)))
Thank you Denise! :)